Drawing an Eye – Shading eyes in graphite pencil
In this video lesson you will discover how to use shading techniques when drawing an eye.
Enroll in the Drawing Academy Course
Pay once - Enjoy forever!
Only $297
Drawing an Eye – Shades Rendering
When drawing an eye, remember that the three-dimensional appearance of the eye drawing can be revealed by rendering eye shades.
Proper rendering must be done according to the Dark to Light rule. Every pencil stroke when drawing an eye is placed with care and consideration. All strokes are separate lines with small gaps between.
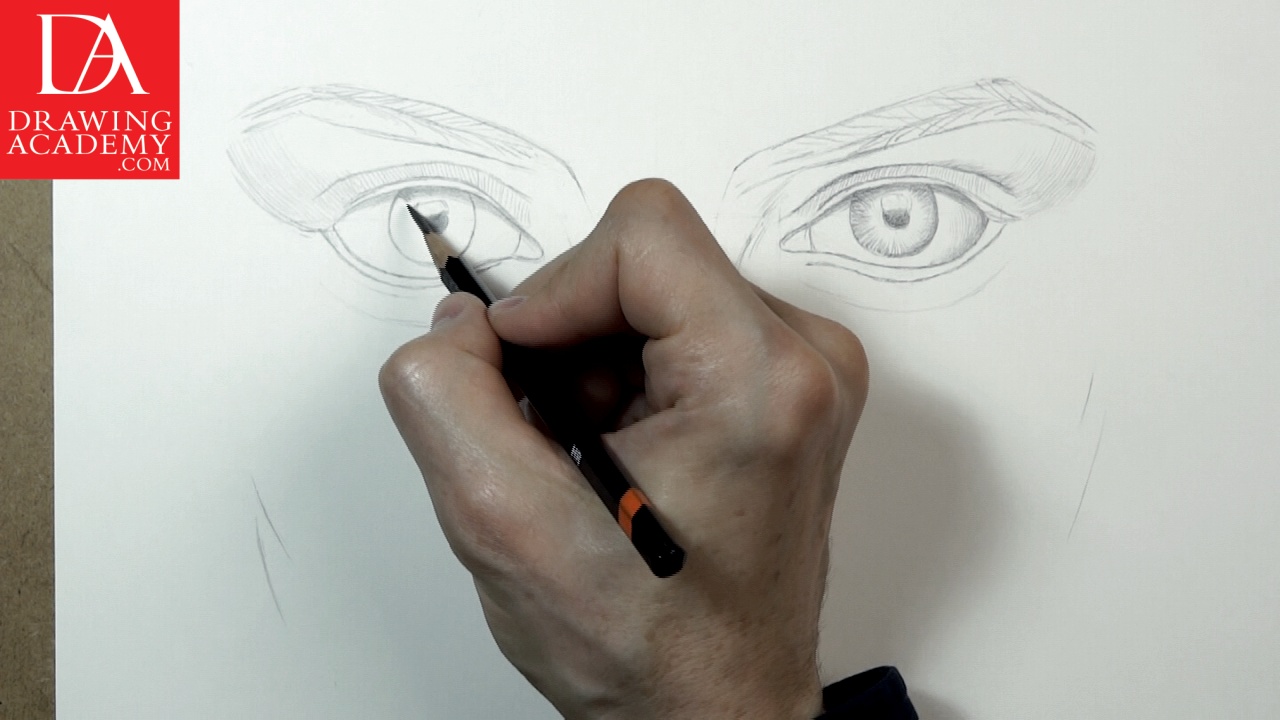
While drawing an eye, a good pencil stroke starts with lighter pressure in the beginning, then more pressure in the middle and ends up with lifting the pencil off the paper. Then, the pencil moves to the starting point of another stroke and the process repeats.
Professional pencil hatching does not allow scribbling or doodling. To achieve skilled rendering, do not glide your pencil back and forth on the paper.
When you are drawing an eye, make a stroke in one direction and then move your pencil backwards above the paper.
The pencil must be sharp at all times. Making a skilled artwork when drawing an eye with a blunt tool is not the professional approach. Use a pencil knife or scalpel for that purpose. A pencil sharpener is only good for kids for safety reasons.
In the professional process of drawing an eye, pencil strokes must be visible. Smooth, strokeless gradations are acceptable in the charcoal technique, not in graphite. The beauty of graphite is in its marks. For that reason, do not use any blending when drawing in graphite pencil. I have seen some drawings in graphite spoiled by smudging separate pencil strokes in one dull mess. Some amateur enthusiasts are advocating graphite pencil blending; they use their fingers and paper stumps to smooth out tonal gradations. This kills the drawing like nothing else does. When I was a student, my teachers at the art academy did not even consider a graphite drawing to be worthy of being marked or accepted as a drawing if it featured any pencil blending. It was an offence against fine art.
When drawing an eye, keep in mind that the sclera, which is the white of the eye, will not necessarily be totally white on the drawing. The brightness of the sclera depends on the amount of light, which bounces off it. Think of a white ball, it has light and shaded areas depending on the direction of light. The same is true with the eyeball.
Amateurish mistakes to avoid when drawing an eye:
Mistake one – 5 Pencil Method:
Some art teachers advocate a 5 Pencil Method. This method teaches to use at least 5 different grade pencils in one drawing. While there is nothing wrong in having a variety of pencils at your disposal, this method does more harm to the student than good.
If you want to become a skilled fine artist, you need to learn how to get the full potential out of one pencil before changing it for another. Your hand skills are much more important than the convenience of a wide range of drawing materials.
Graphite is a flexible media. One grade pencil can provide very delicate light lines when little pressure is applied on the properly sharpened pencil. Increase the pressure and the pencil will give much bolder and darker marks. Your hand must be trained to produce the full variety of tones possible by one pencil grade. Of course, the right grade of pencil needs to be chosen from the beginning. For example, 6H or 4H will be too hard and light for this drawing. There’s no need to go to the other extreme like 5B or 7B; such pencils will be too soft.
One grade pencil can provide a very wide range of tones, starting from very light to very dark. Instructors who teach the 5-pencil method give very bad advice, indeed. I think they either don’t want you to become a skilled artist or lack the necessary knowledge to help you become one. In either case, such an approach will limit your art skills and therefore, your abilities as an artist. Start by learning how to get the best results from using one pencil, then you can expand to multiple grades when necessary.
Mistake two – Drawing from corner to corner:
A good tonal drawing must develop in all places at once. It is an erroneous approach to start with one part of a drawing and rendering it to completion before moving on to another part. I have seen some artists who employ such an approach. They usually start from the top left corner of the drawing and keep going in the bottom-right direction – only after fully rendering an area to perfection. This might work for copy & pasting from a photograph or using tonal swatches; but, these are not fine art. Such artists replace their creative artistic skills with mechanical copying.
Mistake three – Relying on Grey-Scale Values Finder:
Do not limit yourself while learning professional fine art skills. Swatch copying will stop your artistic development.
This also applies to the matter of using Gray-Scale Value Finders. It might sound very strange for those art students who received their art education from some West European and/or American Art schools and colleges, but gray-scale value finders are as good for the professional fine artist as crutches are for a professional runner.
If you have been taught to use gray-scale value finders, think again. Imagine yourself as an Olympic champion in an 100-metre sprint. You have been training to run this distance for many years. What would you say about the coach who advises you, in the beginning of your athletic career, that you need to use crutches first? “After using them,” he says, “you might become a skilled runner who will run without them.” You would think your coach has no knowledge of running at all and you would be right.
To become a professional fine artist, you need to develop your hand, that’s why a single pencil method must first be mastered. Also, you need to develop your eyes so you will be able to compare and judge tonal values without gray-scale value finders. Relying on external aids will keep you a lame walker…I mean an unskilled artist.
Developing fine art drawing skills
Fine art skills are something that cannot be taken away from you. Once you have learned and practiced the magic of drawing, you can rely on your personal skills, not on some external tools. Take those tools, like gray-scale value finders, away and you no longer can call yourself a professional fine artist.
I hope you see the importance of mastering your personal fine art skills without relying on gadgets and tricks.
Drawing techniques were developed throughout many generations of fine artists. The ability to express feelings through art while possessing the necessary knowledge and having strong art skills – these are the characteristics of a proficient fine artist.
A professional and skilled fine artist does not copy reality down to the last point. A hand-drawn piece of artwork is not photography.
Real fine art starts when an artist expresses nature through his own inner world. Observing nature and interpreting it through your own feelings is one part of successful artwork. Art comes with the ability to draw what you have on your mind. That is where practicing your drawing skills help you.


