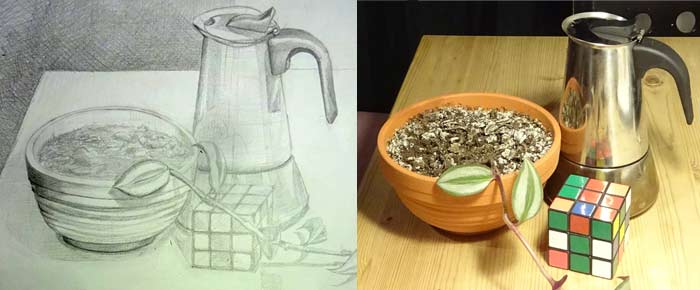
Still-life drawing for critique from Danielle,
Drawing Academy and Anatomy Master Class student
Hello Vladimir,
Thank you for the drawing task you gave me.
I made a first attempt at the still-life and it was quite challenging, especially the bowl. It seems I can’t quite make ovals!
I hope it is satisfactory for our purposes. I must do more of these.
Talk to you soon,
Danielle
Dear Danielle,
Thank you very much for your wonderful still-life drawing. I like your artwork; it is very lifelike, and you put a lot of effort into drawing and rendering it. Great job.
I understand that you are not satisfied with the bowl and ovals, but there are some other points you can improve next time you do a still-life drawing.
Let’s start from the beginning:
1. Paper Layout
A drawing begins with the decision of what layout to use – portrait or landscape.
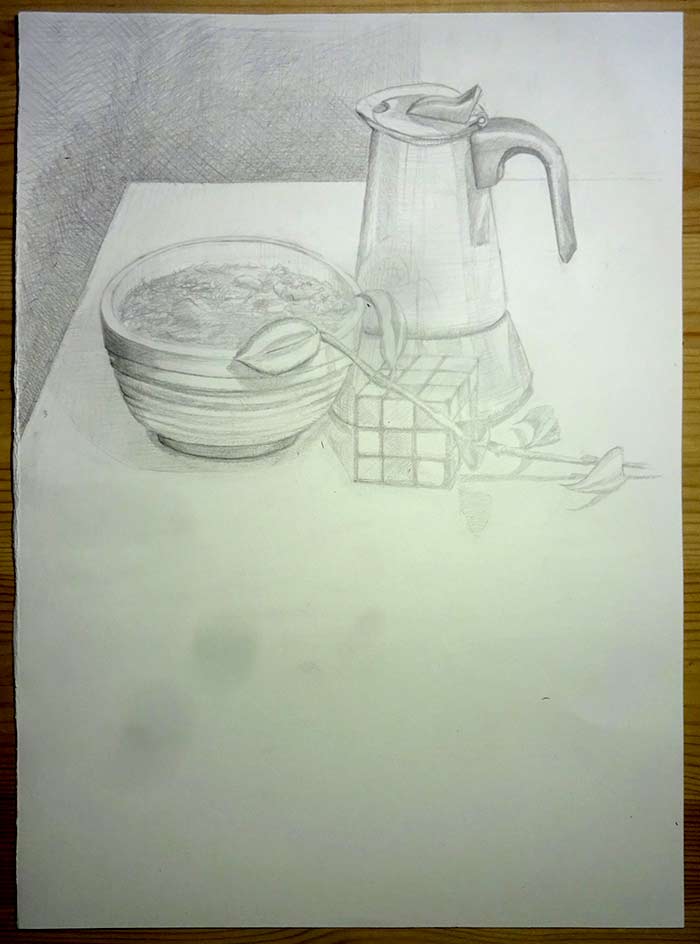
In your still life, the width of the group of objects is bigger than its height, so landscape layout would be a better choice.

2. Composition
You might decide, for whatever reason, to use a portrait layout; nevertheless, your next step would be to compose objects on the drawing area so the group looks balanced and well-placed.
In your drawing, the lower half of the paper is completely empty.
Such a misbalance would be easy to avoid if you check the main proportion of the still life – its height-to-width ratio – and mark it on paper with precision. In this step, you would lock the overall layout of your future artwork and whatever items you draw would be inside that rectangle, which is placed thoughtfully, with the necessary balance.
3. Relative Proportions
In addition to the main proportion of still life, width-to-height ratio, there are many other proportions of items and dimensions of objects in relation to each other.
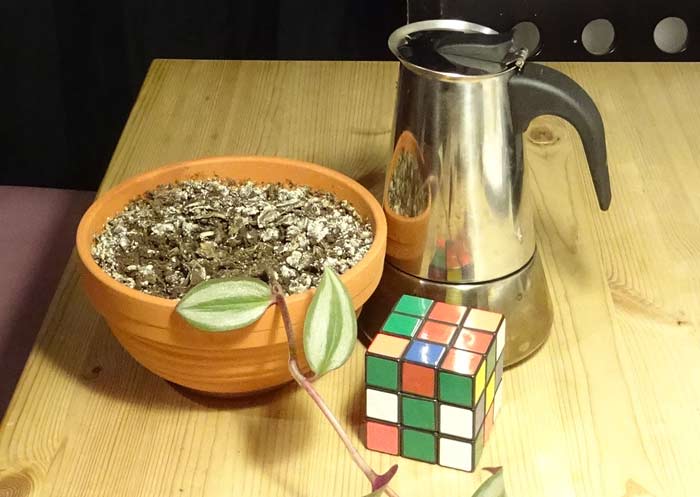
For example, if you check the relative proportion of the width of the bowl to the height of the pot, you would notice that the bowl should be bigger in your drawing.
In life, the width of the bowl is almost equal to the height of the pot. In your drawing, this is not the case.

Constructive drawing is based on measuring proportions; the more dimensions you check, the more accurate your drawing will be.
It is up to you what to measure; it could be the relation of the cube’s width to the width of the pot, which is not quite correct in the artwork or any other relative proportion you may think of.
It is always good to check proportions, not only between different objects but within one object as well.
For example, the width of the visible part of the bowl’s bottom oval fits about two times into the width of the upper oval. In life, this ratio is three-to-one.

4. Alignments
Another rule of constructive drawing is keeping correct alignments.
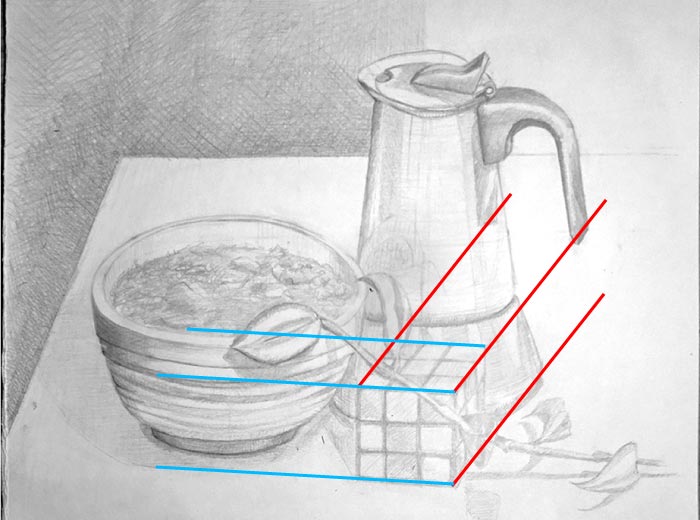
You can plot virtual helping lines, vertical or horizontal, from one object to another (or within one object) and see how they relate in life and in the drawing.
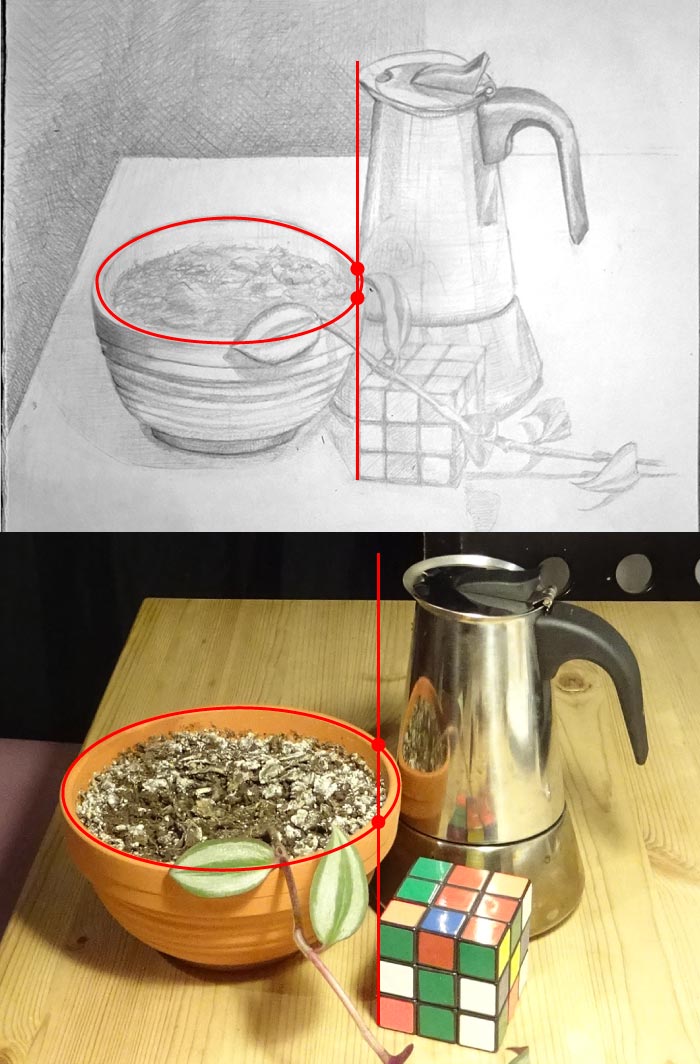
For example, a vertical edge of the cube intersects the oval of the bowl at two dots. In the drawing, the distance between those dots is half what it is in real life.
Also, in the drawing, this vertical line touches the top of the pot while, in life, it misses it by quite a margin.
5. Angles
Helping lines can be not only vertical or horizontal but also any angle you want.
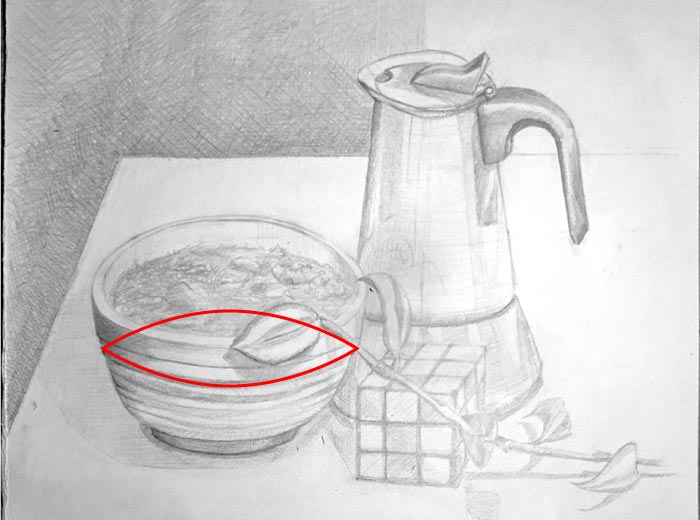
If you draw a virtual line that touches the pot and the bowl at two points and then check on how the same angle line looks in life, you would see that the relative construction of the bowl and the pot is incorrect in your artwork.
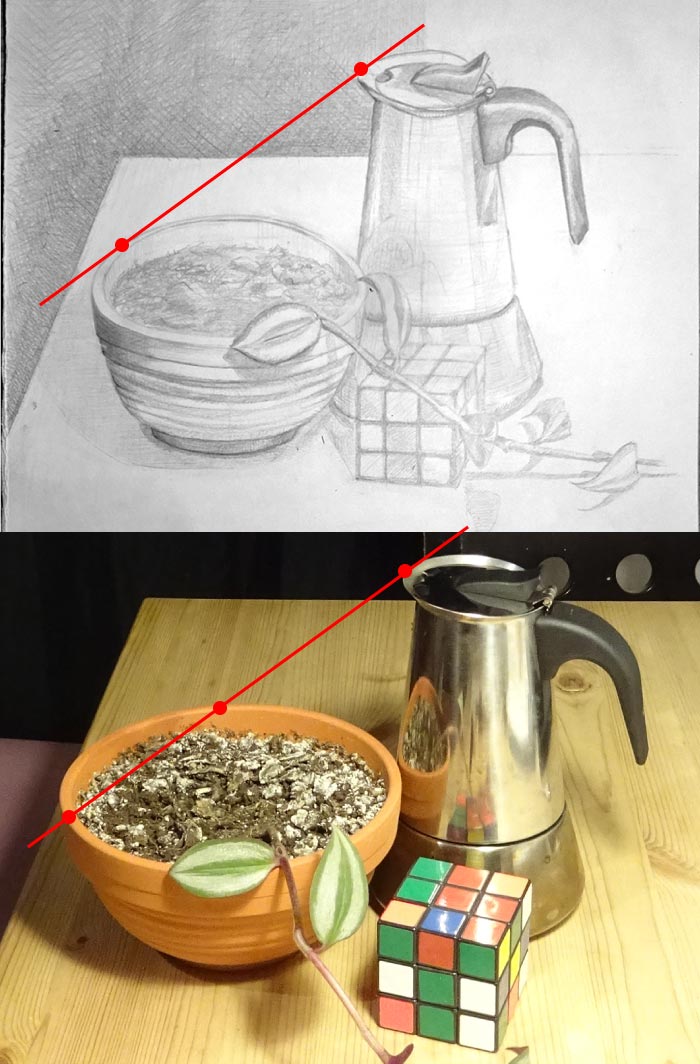
Needless to say, you also have to pay close attention to the angles of lines in perspective. There is a considerable discrepancy between the angles of the red line in the drawing and the green line in real life.
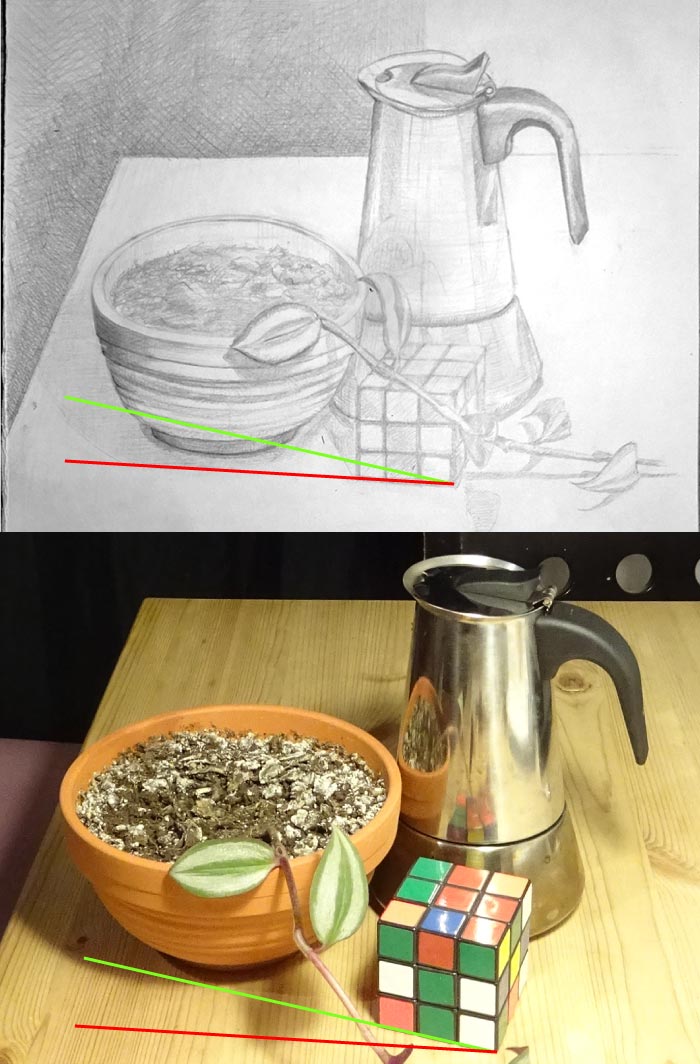
I understand that the photo is taken from a different point of view and would just like to draw your attention to angles, not to point out possible mistakes.
6. Linear Perspective
The angles of lines lead us to another very important principle of constructive drawing – linear perspective.
In the drawing, a cube looks to be in the orthogonal perspective because its lines are tilted in at the same angle and are almost parallel to each other rather than converging into vanishing points.
The orthogonal perspective is good for technical drawings; in fine art, it looks a bit artificial.
7. Ovals
Circles in perspective appear as ovals. All rules of linear perspective apply to ovals as well.
One rule of perspective says that dimensions get smaller the farther from a viewer they are.
According to this rule, the half on the oval that is closer to us should appear a tiny bit bigger than the other half. In the drawing, it is the opposite case.
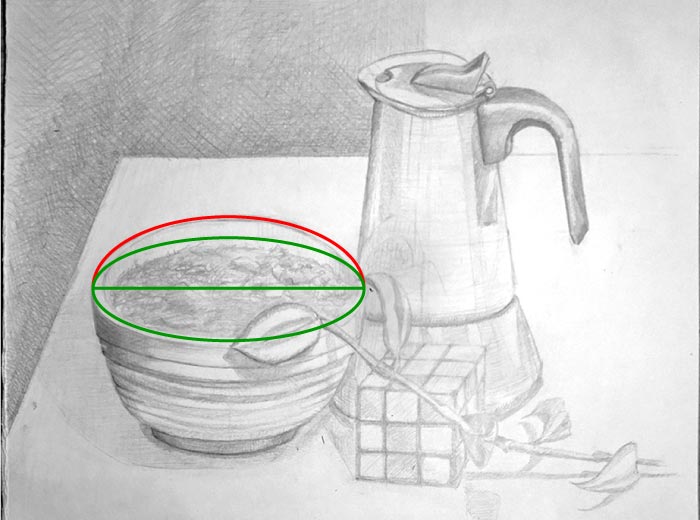
Drawing good ovals requires helping lines of axes. I can’t see any traces of vertical or horizontal axes of ovals in the drawing.
If you draw helping lines of construction, keep them; erasing is not necessary, as correct constructive drawing lines look interesting and convincing and would disappear under layers of tonal hatching anyway.
8. Symmetry
Talk of axes leads us to symmetry.
The top oval of the bowl is not symmetrical, nor is the top oval of the pot.
These are not bad, but not perfect; non-perfect ovals always display their quality, which you didn’t like in the first place.
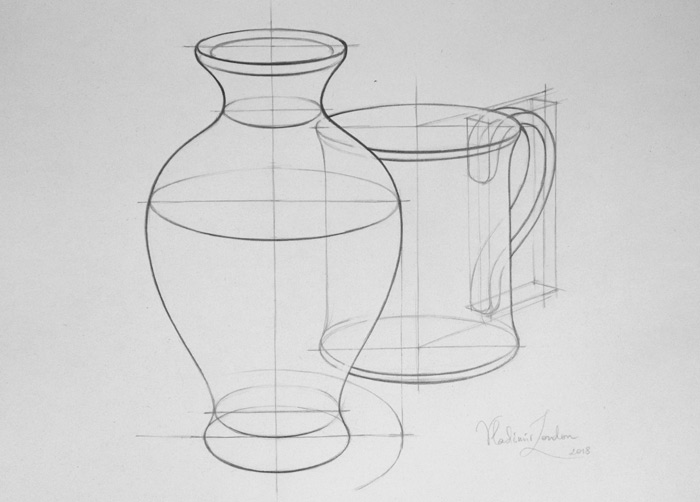
9. Drawing objects as if they were transparent
This is one of the fundamental rules of constructive drawing.
Should you draw secondary ovals as if the bowl were transparent, you would avoid the junior mistake of making them “tuna-shaped”.
You can check the principle of drawing see-through objects in the image below. Also, check the axes of symmetry and the axes of ovals here.
10. Aerial perspective
If we isolate the edge of the table from the rest of the still life, it would be very difficult to say what these angular lines actually mean. This is because there is no aerial perspective in your artwork.
An aerial perspective in drawing means depicting objects and lines that are closer to a viewer with higher contrast, with more pencil pressure and as better defined than those objects and lines that are farther away.
With this rule in mind, you could draw a line of the table edge that goes in perspective, not with uniform pressure and boldness, but starting strong in the foreground and gradually fading it out closer to the background. This way, you would advise a viewer that this line goes away from us.
This is not as you see it in real life because the table has a very shallow depth, not even a hundred metres or so when you would start seeing an aerial perspective in action. But, as an artist, you have the licence to “draw what you know” instead of “copying what you see.”
11. Drawing what you know
This leads us to the most important principle – “drawing what you know.”
All the mistakes listed above would be easy to avoid if you follow the rules of constructive drawing, some of which are listed here:
https://drawingacademy.com/12-principles-of-constructive-drawing
There are many articles published on the Drawing Academy website about this topic. Here are a couple of examples:
https://drawingacademy.com/why-draw-what-you-know
https://drawingacademy.com/drawing-what-you-see-vs-drawing-what-you-know
12. Tonal rendering
The tonal rendering of the background suggests that you have not yet developed your beautiful and personal style of pencil strokes. The hatching is a bit mechanical and dull.
There’s nothing to worry about here. The skill of good rendering comes “automagically,” but you must be there to receive it, practicing many hours, days and months until a pencil in your hand no longer feels like a tool you must control but becomes a continuation of your mind, so you can effortlessly make strokes as you want, not as your hand handles a pencil.
There are certain things you should know about hatching. For example, cross-hatching at the right angle might be good for drawing cloth but doesn’t look attractive in all other cases.
Coming back to the portrait drawings you sent me previously, I mentioned that the problem with portraits might be connected to gaps in your constructive drawing skills. I think, after this critique, you see this yourself.
Don’t be discouraged by how your portraits are coming out. You have plenty of things to improve before it would reflect on the quality of your figurative artwork.
You have a lifetime Drawing Academy membership and can rely on our unlimited personal support; it comes for a lifetime at no extra cost.
If you want, I can also give you drawing exercises tailored specifically to your level of skills, which you could complete at your own pace. Then you could send photos of your drawings for critique when you are done before receiving the next task. Such service is provided at Life Drawing Academy Correspondence Course.
This way, you will be guided to achieve your personal goals in drawing skills.
To your artistic success,
Vladimir London
Drawing Academy tutor
Reply from Danielle
Dear Vladimir,
THANK YOU!!
This is simply incredible! So much help in one critique.
Yes, definitely I will follow your advises to correct mistakes and learn new techniques.
I really wish to improve my drawing skills and your feedback is so helpful.
There is so much information there and I am ready for the next task!
I am immensely grateful!
Thank you!
Danielle


Great advises Vladimir.
Good work Danielle
I find these critiques to be rather phenomenal. I save many of them because they demonstrate certain facts that I sense is missing when I make drawings. This has been a fine critique and everything is clearly understandable. Learning from critique like this is certainly very teachable. If everyone could receive such a wonderful critique as this a learner could easily advance. I believe you have been given a marvelous critique and an opportunity from which you can learn a great deal!