Question from Zoe
Hi,
I can draw a reasonably accurate portrait when I use a photograph, but when I put the reference away and try to invent a face, the result looks flat or generic. The features move out of place, and all my characters begin to look like the same person.
How can I learn to draw convincing portraits from imagination?
Dear Zoe,
Thank you for this important question. Drawing from imagination means using knowledge that you already have. If the structure of the head, perspective, anatomy, and facial proportions are not yet clear in your mind, the drawing will become uncertain.
That is why t problem is not a lack of imagination, but a lack of dependable structural knowledge.
DRAWING FROM IMAGINATION IS NOT GUESSING
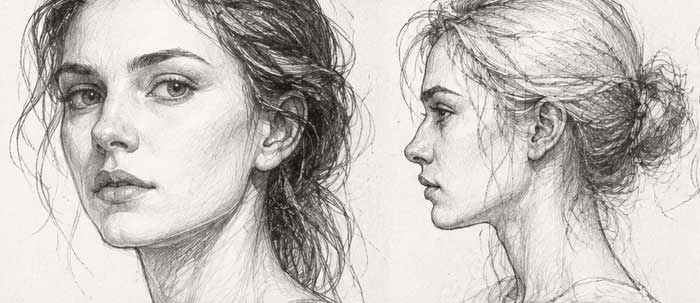
An imagined portrait still has to follow the same principles as a portrait drawn from life. The head has volume. It turns in space. Its features sit on curved and angled surfaces. The skull supports the face, and the facial muscles influence its appearance.
When an artist memorizes only the visible symbols of a face: two eyes, a nose, a mouth, and an outline the result usually looks flat. These symbols may identify a face, but they do not explain how the head is constructed.
A proficient artist does not begin by decorating an empty outline with facial features. The artist builds the head as a three-dimensional object.
CONSTRUCT THE HEAD AS A SOLID FORM
Begin with the biggest masses. The cranium may be simplified as an egg-like or spherical form, while the lower face can be treated as a block or wedge attached to it.
Before drawing the eyes, nose, or lips, establish:
• the tilt of the head;
• the direction in which it turns;
• the central axis of the face;
• the brow line;
• the position and angle of the jaw;
• the relationship between the cranium and the facial mass.
The central axis should travel over the surface of the head like a contour. It is not a straight line pasted onto a flat oval. When the head turns, this axis curves and moves toward the far side. Horizontal guide lines must also wrap around the form.
These construction lines help you think in three dimensions. Even when they will not remain visible in the finished drawing, they guide the placement of every feature.
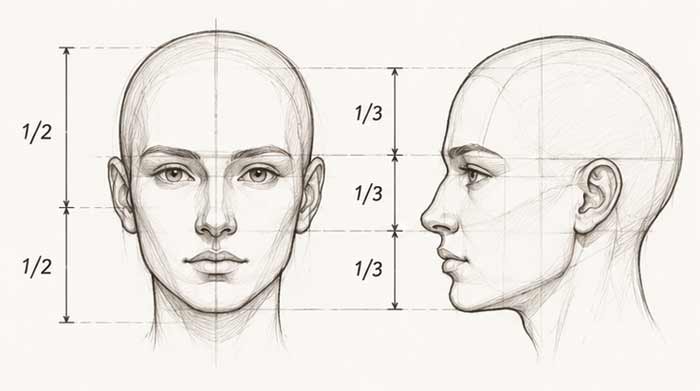
USE PROPORTIONS AS A FRAMEWORK, NOT A STENCIL
Classical proportions provide useful starting points. They help an artist compare the height and width of the head, place the brow, nose, mouth, ears, and eyes, and check the relationships between features.
However, a proportional canon is not a portrait.
Real people differ. One person has a longer lower face, another a wider cranium, a shorter nose, deeper-set eyes, a heavier jaw, or a higher forehead. When every imagined head is forced into the same formula, every character begins to look related.
Learn standard proportions first, but then study how real heads vary from that standard. Character appears in the differences.
Instead of asking only, “Where should the nose be?” ask:
• How long is this particular nose compared with the lower face?
• How wide is the jaw compared with the cheekbones?
• How much does the mouth project?
• Is the forehead vertical, rounded, or sloping?
• Are the eyes deep in the sockets or more prominent?
• Is the face symmetrical, or are there subtle differences between the two sides?
These relationships create individuality.
KNOW WHAT LIES BENEATH THE SKIN
The visible form of the head is largely determined by the skull. The forehead, eye sockets, cheekbones, nasal opening, upper jaw, lower jaw, and chin all influence the surface.
You do not need to draw every anatomical detail in every portrait. You do need to understand which structures create the forms you see.
Study the skull from the front, profile, three-quarter view, above, and below. Draw it from life when possible. Sculpting a simple skull or facial feature in clay can also be extremely useful because it gives you a tactile understanding of volume.
After studying the skull, learn the principal facial muscles and fat pads. This knowledge will help you understand why the mouth changes shape, why the cheeks rise in a smile, how age affects the face, and why expressions cannot be created convincingly by moving the lips alone.
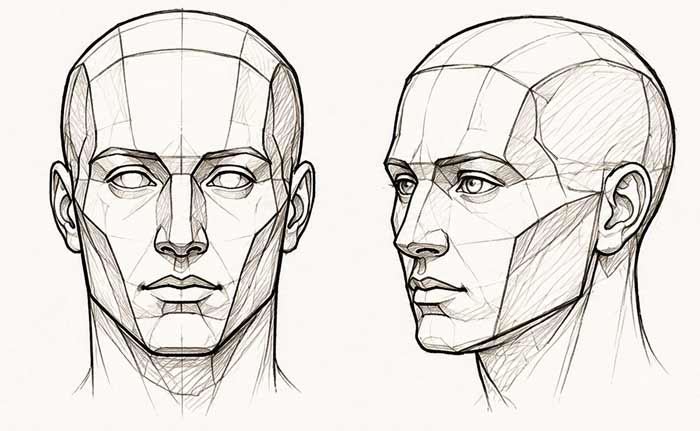
THINK IN PLANES, NOT ONLY IN OUTLINES
A face is not a smooth mask. It consists of many planes that turn toward or away from the light.
The forehead has front and side planes. The nose has a bridge, side walls, wings, and a base. The cheek area changes direction around the cheekbone. The muzzle around the mouth projects forward. The jaw turns under the head and back toward the ears.
When these plane changes are understood, even a simple line drawing can feel solid. When they are ignored, additional shading will not solve the problem.
This is why some heavily rendered portraits still look flat: the tonal values have been placed on an incorrectly constructed surface.
First build the form. Then use tone to reveal it.
ROTATE THE FEATURES WITH THE HEAD
Beginners often turn the outline of the head but leave the features facing forward. The result feels distorted because the eyes, nose, mouth, and ears do not share the same perspective.
Every feature has volume:
• The eye sits inside a bony socket and eyelids wrap around a sphere.
• The nose projects from the face and has visible top, side, and underside planes.
• The mouth curves around the dental arch.
• The ear has thickness and changes shape dramatically when seen from different angles.
Practice each feature as a three-dimensional object. Draw an eye, nose, mouth, and ear from several viewpoints rather than repeating one familiar symbol.
When the head turns, the near side usually appears wider, while the far side becomes narrower through foreshortening. Features overlap differently. The bridge of the nose may partially cover the far eye. The corner of the mouth follows the curvature of the muzzle. The far jawline may become shorter or disappear.
These changes must be constructed, not guessed.
STOP DRAWING SYMBOLS
Many artists unconsciously use memorized signs: an almond for an eye, a hook for a nose, two lines for lips, and a helmet-like shape for hair.
Symbols are fast, but they contain little information about volume. They also make different characters look alike.
To break this habit, simplify features into solid forms. Think of the eyeball before the eyelids, the nasal block before the nostrils, and the cylindrical muzzle before the lips. Think of hair as large masses that sit on the skull before drawing individual strands.
Do not ask, “How do I draw an eye?” Ask, “How is this eye constructed, how does it sit in the socket, and how does it turn with the head?”
BUILD VISUAL MEMORY DELIBERATELY
Visual memory does not become reliable through passive looking. It must be trained.
Use this four-stage exercise:
1. Study a head from life, a sculpture, or a well-lit reference. Analyze its construction and proportions.
2. Put the reference away and redraw the head from memory.
3. Compare the memory drawing with the reference. Mark what you misunderstood or forgot.
4. Draw the same head again from a different viewpoint, using your structural knowledge rather than copying its visible outline.
The comparison stage is essential. Without it, you may simply repeat the same errors.
You can use this method for the whole head or for one feature at a time. A focused study of noses, ears, mouths, skulls, or jaw shapes will gradually expand your visual vocabulary.
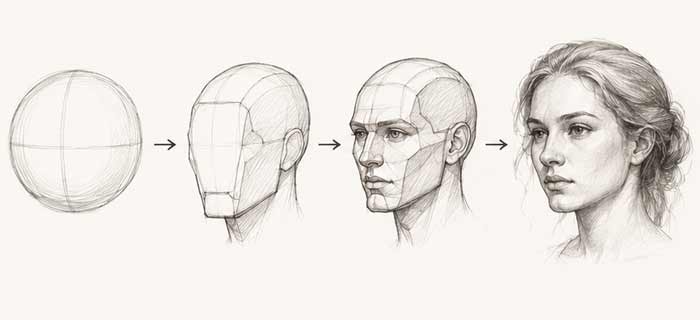
MAKE IMAGINED PORTRAITS LOOK LIKE DIFFERENT PEOPLE
A believable imagined character needs more than correct average proportions. It needs a specific design.
Before adding details, decide who the person is. Consider age, ancestry, body type, temperament, health, occupation, and life experience. These factors can influence posture, expression, skin, hairstyle, and facial structure.
Vary the large forms first:
• cranium height and width;
• facial length;
• cheekbone width;
• jaw angle and chin shape;
• forehead slope;
• nose length and projection;
• eye size, spacing, and depth;
• mouth width and lip structure;
• neck thickness and head posture.
Do not rely only on hairstyles, wrinkles, or accessories to make characters different. If two bald, expressionless construction drawings look like different people, the design is working.
USE TONAL VALUES TO REVEAL FORM
Light and shadow should explain the construction that is already present.
Choose one clear light source. Identify the major light and shadow families before rendering small details. Ask which planes face the light, which turn away, and where cast shadows fall.
Keep in mind that dark accents do not automatically create depth. A portrait becomes three-dimensional when tonal values describe the turning of form. Hatching can support this effect when the strokes follow the contours of the head rather than merely filling areas with gray.
Avoid polishing the eyes and lips while the cranium, jaw, and facial axis remain uncertain. Detailed rendering cannot rescue weak construction.
A PRACTICAL EXERCISE FOR YOUR NEXT 30 PORTRAITS
For the next 30 studies, spend more time constructing and less time finishing.
Draw ten heads as simple transparent forms. Use axes, cross-contours, and perspective lines. Do not add facial details.
Draw ten skulls or simplified anatomical heads from different viewpoints.
Draw ten imagined portraits with deliberately varied proportions and character. Keep the first stage light and visible. Check the big forms before rendering.
After every drawing, write down one structural problem you noticed. This will turn practice into focused learning rather than repetition.
CAN YOU USE REFERENCES?
Yes. References are valuable when they are used for study.
The goal is not to avoid looking at reality. The goal is to avoid depending on a flat picture for every decision. Draw from life, sculptures, mirrors, and photographs while actively analyzing construction. Then test what you have learned by drawing from memory and imagination.
A reference should provide information. It should not replace thinking.
To draw portraits from imagination, you need more than a collection of facial symbols. You need knowledge of perspective, proportions, skull anatomy, facial structure, contours, and tonal rendering.
Study real heads. Construct them as transparent three-dimensional forms. Memorize principles rather than outlines. Compare your memory drawings with reality. With consistent and intelligent practice, imagined portraits will become more solid, varied, and convincing.
Related study:
Review the principles of constructive drawing
and the existing guide to drawing portraits from memory and imagination.