Question from Hikalu, Drawing Academy student
 Hi,
Hi,
I’m very much a beginner. I did learn perspective, and I am now doing practice of hatching. I may be following hatching guide or video lessons, but mine looks very cheap, especially curved lines like a sphere.
What is the difference between yours and mine? I can’t find it, and I don’t know what I should do.
I don’t think quantity of lines matter because Old Masters did excellent hatching with fewer lines. Right?
Thanks
Hi,
Many thanks for your question.
There two things you need to do to improve your hatching style:
1. Learn the right way
Please check Chapter 11 of this video lesson:
//drawingacademy.com/help-i-cant-draw
2. Practice for many hours
If you’ve spent less than 20 hours on this task, you haven’t even started.
Also, as you wanted to draw a sphere, please check these images:


Here’s what you need to pay attention to:
- Sharpen an HB graphite pencil to a fine point.
- Control the pencil pressure; as you can see, it is very light, and every stroke starts and ends with very fine touch. You won’t find a single pencil stroke with a bold end.
- Hatch in multiple layers of strokes. Every stroke on the ball goes along its contour (do not confuse with its outline). Contours of a sphere are ovals.
- Pay attention to tonal values. Tones are done in very smooth gradation from light to dark.
- Do not smudge pencil strokes whatsoever. Do not cheat yourself.
- There is no bold outline around the sphere; there’s actually no outline in pencil stroke at all. The sphere’s outer shape is depicted by difference in tones.
- The sphere has an accent – the darkest place on the drawing.
- Note how the core shadow goes perfectly along the contour (oval).
- Note how smoothly the core shadow transforms to a dark-halftone and a form-shadow.
- The background is rendered darker only where the light part of the sphere is; in other places it is very, very light.
- The cast-shadow fades very smoothly to the background.
- The front edge of the cast-shadow is not outlined by a pencil stroke.
- There is a lighter reflection between the accent and the form-shadow.
- All pencil lines on a ball and background are curved.
- All tonal rendering is done in thousands of separate pencil strokes without smudging.

Regarding the Old Masters, you need to learn the classical way of hatching; mastery comes with practice.
I hope this helps.
Best regards,
Vladimir
Update from Hikalu, Drawing Academy student
Hello,
After your advice, I spent few weeks drawing simple geometrical objects like spheres, cylinders and cubes.
I feel a pen is not best my friend yet. But I got better.
This is my latest drawing of a sphere, I did it with HB pencil.
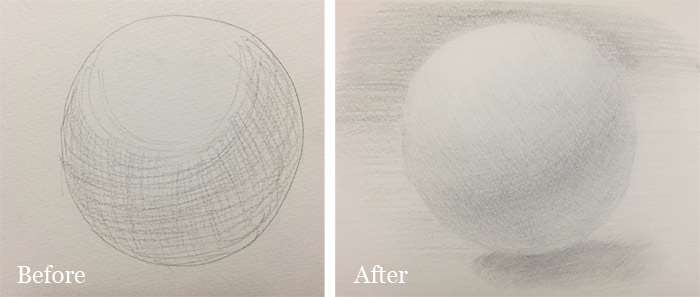
Thank you so much for your help!
Reply from Vladimir London, Drawing Academy tutor
Many thanks for your sphere drawing.
You have achieved a great improvement in just three weeks. Great job!
I really like how you depicted smooth gradations of tonal values. Your pencil handling is much more confident now.
Here is one piece of advice: next time you can sharpen several pencils at a time and use them one by one to ensure a pencil tip stays well-pointed during the whole duration of drawing.
You may want to make another drawing of a sphere, this time on A2-size paper, placing the drawing board almost vertically and holding a pencil using a “candle grip.”
Spherical surfaces can be found everywhere, from man-made items to organic objects. When drawing a human figure or a portrait, you will find many rounded places where your skill at rendering spheres will be useful.
Best regards,
Vladimir


Hi Vladimir,
thanks for that useful explanation! My experience since I follow your instructions is to believe in my teacher and work with maximum diligence.
Hi Hikalu,
from the point of another student I agree in one point the most!
With thousands and thousands…even millions of strokes practiced you´ll get automatically much better results and fine-motoric.
For me the key to advance was to have a white sheet of paper/sketchbook and a pencil wherever I go and stay and practicing millions just simple hatching-strokes all the time when it was possible or as company of computer-surfing, reading …..
Of course also with attention that each stroke does not have a (strong) visible beginning or end, each stroke touching and ending the paper clear but smooth. With the time strokes become very much more similar one to each other and finally you also can get a smooth surface which even doesn’t look like a couple of strokes but a perfect shaded surface like others try to get with smudging.
Try hard, have great success! First it seems exhausting but soon you become a
stroke addict …. it changes into great fun :-)
good job if you want to try hatchings make sure its so close together you can barely see it up close
Hi! I do think the amount of lines matter. In fact the more lines crossing on top of each other and covering the paper the darker it gets. Your paper is light and the graphito is what you used to turn down gradually the lights on an object. Don’t forget that giving volume is all about light and shadows. That’s simply what makes objects appered with volume. Your lines look great they are aware on the direction and the roundness of the ball. I will suggest try working next layers on top to make the shade fade into a darker zone where the shadows are darker.