Drawing a portrait on Huion Kamvas Pro 24 (4K) pen-display
Watch this video to find out why a Kamvas Pro 24 (4K) is a perfect drawing equipment for digital artists, illustrators and designers and to see how Vladimir London, a Drawing Academy tutor, creates a manga-style portrait using this display.
In this video, you will see the complete process of drawing a manga artwork on Huion Kamvas Pro 24 pen display. If you are a digital artist, illustrator or designer, this display is a great tool to have. It is available from Huion official store as well as on Amazon:
Official Store: https://is.gd/wx81Iw
Amazon: https://is.gd/VvTUKP
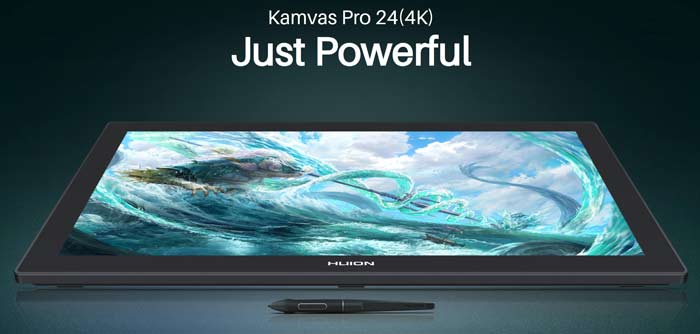
As pointed out in the name, this display measures 24 inches and has 4K resolution. The color gamut is 140% sRGB. The surface is fully laminated and made of anti-glare etched glass, which feels like paper under the stylus. The screen uses the HDR technology, which stands for High Dynamic Range that improves brightness, contrast and color. A digital stylus has no batteries, which makes it ready to use at any time. There are ten spare pen nibs, including 5 standard and 5 felt nibs, as well as a pen stand. Pen sensitivity, report rate and tilt support will satisfy the needs of every digital artist. There is also a mini keydial that comes together with the display. Inbuilt folding stands allow the display to tilt at a 20-degree angle. Alternatively, adjustable stands can be used. Let’s unpack the Kamvas Pro 24 (4K) display. It comes in a well-designed box. Here’s what they say on the box: the 4K resolution is 3840 by 2160 pixels; the active screen size is 527 by 296 millimeters; 140% sRGB color gamut; a digital stylus without a battery; and so on. This display is compatible with Windows, Mac, and android devices. On the back side of the box, there are illustrations on how to connect the display to a PC or laptop, as well as the webpage where you can download the driver. At the top, this big box has a handle, and inside is a well-packed and well-protected content. I will remove the polystyrene foam that holds inside a brown cardboard box and the display itself. The display is placed into a protective plastic bag. In a plastic pouch, there is a soft wiping cloth, a well presented Quick Start Guide, and a special Huion-branded black glove, which covers two fingers and makes movements of the hand on the glass screen smoother. Also, it protects the screen from hand-marks, wiping the surface as you draw. In a separate box, there is the Keydial Mini device. It is a great addition to the display because its dial and buttons can be programmed with different functions and shortcuts. It has the USB-C port for charging and wired connection. This gadget is a great addition to the display. There is also a Quick Start Guide, which is also a Warranty Card. And this small box also contains the USB cable. The USB-C plugs into the device and the other end of this cable has a standard USB connector.
Let’s check the stylus. It comes in a separate box. The pen is in the plastic sleeve. It is a very nice-looking stylus; not too thin or thick. Its grip is covered with silicone rubber, which is non-slipping and very pleasant to touch. This pen comfortably sits in the hand and has two ergonomic buttons. I have to say, it is a very nice pen. Also, there is a black pen stand. A pen can be placed horizontally or vertically. Inside of this stand, there are ten spare nibs and the nib remover. This remover is shaped like a ring and is easy to use when replacing a nib. Five plastic and five felt nibs will go a long way. It will take years to use them all. The inside surface of this nib-holder is covered with silicone rubber, which shows attention to detail and high quality of Huion devices. The pen displays requires power and it comes with an adaptor. The cable is long enough to arrange the working environment nicely. There are also other cables. Here is the power cable. I ordered the European plug, but I’m sure, depending on your country, the Huion store sends plugs that fit your sockets. Its length is also good, not too long or short. The three-pin plug goes into the adaptor. There are also three cables. Here is the USB-C to USB-A cable. One more cable has two USB-C ends protected with plastic covers. And the last cable is for HDMI connection. Now, it’s time to check the display. The overall look is minimalistic, without any buttons or indicators on the front side and with a nice small frame around the screen. On the back side, there are two foldable supports. The display can be mounted on a standard one-hundred by one hundred arm or stand. Small ventilation holes tell me that this display won’t get too hot in use, which is very good. At the bottom, there are three rubber anti-sliding bits. I like that they are small in size and discrete. At the side, there is a standard three-and-a-half millimeter round audio port and two USB-A ports. At the top, there are several connectors as well. Here’s the power socket. Next to it, is the USB-C port. And there are also two video ports. Let’s plug the power cable. After plugging in the USB cable, this display is ready to be connected to a computer.
Before using this display, I need to install a driver on my laptop. It is available to download from the Huion website. The driver is small in size and easy to install. Just save the file, double-click it and follow the instructions. After connecting the display and opening the driver’s interface, you can amend the settings as you like. At the bottom, there is a selector of connected Huion devices. In the “Working Area” tab, you can set up this display as the second monitor. It can be rotated at 90-degree angles. Also, you may change the working area to full, ratio, or custom area. The monitor calibration is for fine-tuning a cursor with precision. The digital pen tab opens the stylus interface. Two buttons are programmable. You can set them up to whatever you like. “Right-click” for the top button and “None” for the lower one comes by default, which is good for me. The Pressure Setting tab opens a simple interface to fine-tune the pen to your style of drawing. You may increase or decrease pressure settings and test how you like it. By playing with different presets and custom-changing sensitivity, you will come up with the pressure settings that fit your hand and drawing style. Some artists press on a pen rather hard while others prefer light pencil strokes with high sensitivity. There is also an advanced setup button that allows you to change the maximum force settings.
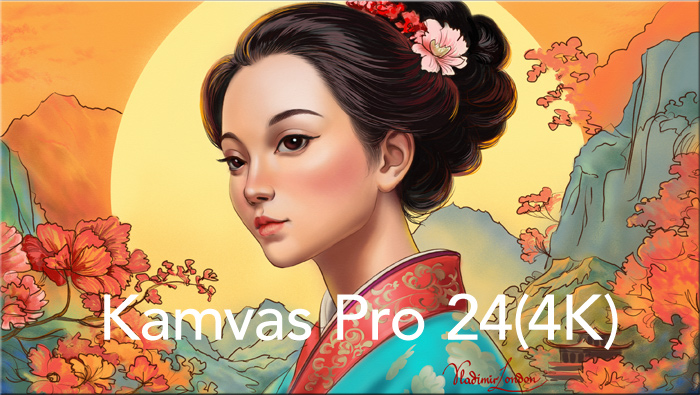
When you connect the Keydial Mini to your computer, it will become available in the interface. All settings for this device are easy to understand and intuitive. This is a cool and very handy gadget that can be programmed as you need to handle many functions. It is like a small keyboard where you decide what every button will do. It is great for shortcuts, which you often use. Instead of pressing key-combinations on a keyboard, this Keydial can do it with one button. I’m checking the default settings, which can be amended with ease. The dial can be programmed as well. By default, it is set to scrolling up and down, but this function can be changed. Every button is also programmable by clicking on it and selecting what you want. The array of available functions is rather impressive. A button might work as a keyboard key, or as a mouse button, or even run some application and multimedia functions. With 18 buttons to set up, it is more than an average user might need for shortcuts, for example. At the top, there is also the “Programs” button. Here, you can add a program that is already opened on your PC and make custom settings that will be valid for that particular program. The “Settings” button gives the information about a connected device. You can also export and import saved settings, which is great should you accidentally reset all your settings or use Huion devices on another computer. The “General” tab comes with Language, Color scheme, and Hotkey selectors. The device settings for the display have brightness, contrast ratio, and saturation sliders, which I leave with default settings. However, for color setting, it is better to switch from Adobe RGB to sRGB unless you have a very good reason why you need the Adobe RGB mode. You can backup the display settings as well should you need to restore them later or use the pen-display with another computer. I like this simple, yet comprehensive interface and functionality that have been built with user experience in mind. After using this display and Keydial for a while, I have to say that the driver is stable and I had no glitches or malfunctions whatsoever. With the driver settings explained and the device ready to use, it’s time to make a digital manga illustration. Here’s the final result I will achieve by the end of this video.
For drawing, I will be using the Rebelle 6 program. It is a great software that imitates different drawing and painting media and creative styles. First, I will roughly mark the main proportions of a human head. A cranium can be approximated as a sphere. This is the biggest volume of a human head. The next in size is the facial area. The level of eyes divides the head’s height in half. The next important proportion of a head is three equal parts: the height of the forehead, the nose and the distance from the nose to the bottom of the chin. The central line of the face symmetry is a very important landmark. The height of the ear is approximately equal to the height of a nose. The top and bottom edges of these facial features are located on the same levels. The neck is connected to the base of the skull. At this step, the goal is to draw the head’s construction; fine-tuning the facial features will come later. Also, you may see that I draw from big masses to smaller details, not vice versa. This allows to establish main proportions and avoid numerous mistakes a beginner artist would make.
Did you know that there are 51 portrait drawing rules a proficient artist must know to draw realistic portraits from life and imagination?
To connect the neck to the shoulders correctly, I depicted the oval of the first pair of ribs. It is not horizontal, but tilted. How to draw a shoulder girdle is also explained in a separate video. I also designed a special paper model for the Life Drawing Academy Correspondence Course students, so they could make it at home and draw this model from life.
With the rough sketch in place, I can now draw precise outlines of the face and facial features without worrying about proportions. Making a preparatory sketch is optional. If you have sufficient knowledge of a human head anatomy, planes, angles, alignments and proportions, there is no need in sketching. You could keep those things in mind and draw what you know.
How to sketch portraits step by step is described and illustrated in depth in my book “How to draw a portrait”. This book is available in various formats on Amazon.
Also, if you are interested in self-learning portrait drawing, the best option is to take the Life Drawing Academy Online Course. It comes with 52 video lessons on figure drawing and portraiture. If you feel that your knowledge of anatomy for artists has to be improved, there is another great course that explains everything you need to know about human body anatomy. This online course is called Anatomy Master Class.
I will schematically sketch the hairstyle. Later, I may change it a bit or leave it as is. The idea I have in mind for this composition is a girl’s head with dark hairs on a light yellow background. The light-dark contrast will make this artwork picturesque. It won’t be a hyper-realistic drawing, but a stylized illustration in the manga style. Later, I will remove the light preparatory sketch level, but leave the dark outlines. The background is sketched in a few lines just to indicate the major masses. Smaller details are marked in dark lines.
With the linear drawing complete, I can begin coloring this artwork. I really like how the stylus glides on the screen surface. The Huion display has the etched glass surface, which feels like smooth paper under the pen. I prefer drawing without a glove because this is how I used to work on paper. With very light pressure on the screen, my hand moves freely.
There are many manga styles, but they come with similar features, such as stylized linear drawing and bright colors. So, I will follow this tradition in this artwork and use saturated hues for the detailed background.
At this step, the job is simple: I fill big areas with shades of yellow and orange-yellow colors. My hand barely touches the display surface. Even though I grip the Huion pen lightly, it sits in my hand firmly without slipping.
The whole background is covered with warm colors. This is a good underpainting to build-up other colors on top. I want to keep the viewer’s focus on the girl’s head, that is why the background will be done with low light-dark contrast. The cold-warm contrast will also be reduced as well as the contrast of saturation. If you want to learn more about seven contrasts of colors, you will find the topic of color theory fully explained in the Watercolor Academy course.
I am erasing the orange sky edge to make a perfect circle of the sun. In digital drawing, it is easy to draw not only by applying colors, but also by erasing. The background is gradually taking shape. The technique I’m using right now is called “Pen and Wash” in watercolor painting. The same approach is applicable in digital drawing. This is when coloring can be diffused, almost abstract, but the picture will be recognisable due to a well-defined linear drawing that was created beforehand. This is a rather fast way of color drawing. The program I’m using, Rebelle, can imitate different mediums, including watercolor, when paint would spread out on moist paper and even run down like real watercolor, creating very picturesque effects. However, the creative task I have in mind is a bit different. I selected a hot-pressed paper surface to get smooth transitions of colors and tonal values without texture and special effects.
I really like this display performance. It does not get hot. It is lag-free. The parallax is minimal. In fact, I do not see any gap between the pen tip and the cursor. I also like very much how this Huion screen displays colors. The color calibration is perfect and the color gamut is amazing. The pixel density is such that I do not see individual pixels. It is a very pleasant experience to draw on such a pen-display. As a fine artist and designer, I have extensive experience in art, both digital and traditional, and this display comes with everything a professional designer or illustrator would need. It has a big size, great colors, 4K resolution, fast and stable performance. I have to say that Huion did a great job on designing and building this equipment. The 20-degree angle is well-calculated. This is exactly how I would want this display to be tilted. I used to draw on a horizontal surface and when painting in watercolor, I would keep the board at about 15-to-20 degrees. It feels comfortable for eyes and hands. Of course, if you want to place a digital display vertically or at some steeper angle than 20 degrees, you would need a special stand, which is available separately at the Huion online store. However, I find it perfect as is.
For me as an artist, the best thing about this pen-display is its colors. It comes with an impressive color gamut, contrast ratio, number of colors and viewing angle. It is capable of displaying over one billion colors. I’ve heard that a human eye can see about 10 million colors, which means that this display actually can show 100 times more colors than we can detect. This is huge! Also, the contrast ratio is one thousand two hundred to one, which is very impressive, so is the color gamut, which is one hundred forty percent of sRGB.
Talking of color spaces, although the sRGB has a narrower gamut than Adobe RGB, it is perfect for general use, especially when you design images to be viewed online, on screens, and be printed on most color printers. However, if you are a professional illustrator who makes graphics for high-quality printing, Adobe RGB might be a better choice as long as your artworks will be printed in special labs, not on usual printers. In terms of the gamut, Adobe RGB covers more green colors than sRGB, but nevertheless I would go for sRGB for all digital projects I do.
Another good thing about the Huion screen is its viewing angle, which is one hundred seventy eight degrees. It is very close to 180! It is very unlikely that you would be looking at your screen at such an oblique angle, but what it really means is that the colors and tonal values will appear the same at different angles of view. The saturation would reduce should you look at a very oblique angle, but this is not how you would use such a display.
The full laminated anti-glare glass screen is also very important. The etched glass gives no reflection, no glare. Also, because its surface is finely textured, it feels like very smooth paper under the pen tip, not as a slippery glass. This effect can be increased by changing a standard plastic nib to a felt nib. Which nib to use is down to personal preferences. Some artists like more friction between the screen and a pen, others might prefer smoother pen gliding. As for me, I feel comfortable in both cases, but it is good to have spare nibs both made of plastic and fibrous material.
When it comes to the pen performance, I think it is better than you would need. It has over eight thousand levels of pressure sensitivity. I do not think that any human could control a hand with such precision of pressure. Also, it has over five thousand LPI pen resolution. Once again, you would not need such high precision for digital drawing. In addition, the pen supports tilt up to 60 degrees. So, it is really better than an average user would need. Also, because this pen is battery-free there is no need in charging or issues with the battery life-span. This is a solid, great performing stylus that would satisfy all your digital drawing needs. By the way, its non-working end does not have an eraser, which is a good thing for a professional artist because an eraser is just a digital brush that can be handled with high precision when working with a fine nib instead of a blunt non-working end. I like it that way and honestly do not see a point in adding extra functionality to this stylus.
I’m filming the process with a camera positioned above the display, and you could see that there is no reflection or glare whatsoever. The non-reflective glass is smooth, fine-textured, and pleasant to touch. This Huion Kamvas Pro 24 (4K) pen-display is a great piece of equipment! It is solid, stylish, well-built, and has stable performance. It had no glitches or driver issues. It switches on with a swift push of a button and loads quickly. It switches off with ease as well. If you are looking for a big size, good-performance, rich-color, high-resolution pen-display for a very reasonable price, the Huion Kamvas Pro 24 (4K) would be a great choice!
Official Store: https://is.gd/wx81Iw
Amazon: https://is.gd/VvTUKP


