Encaustic Portrait – Daphne
Video by Vladimir London
Before we begin, I will make a quick preliminary sketch in one of my sketchbooks. Here are several of them. I love sketching and portraiture is one of my favorite genres. Over many years, I have done thousands of face and head doodles. I will flip through the pages to show you just a small selection of face sketches. I draw portraits from life, memory and imagination. Also, I draw classical sculptures and busts in museums as well as sculpt in clay busts with classical proportions to draw from. All portrait sketches you see here are done in pen and ink. I love drawing in ink because this is a non-forgiving medium that is very difficult to erase. Fixing mistakes in ink is not possible, which makes me pay more attention to quality and precision of lines. Every line I draw is final. If I don’t like some sketch, there is no way to amend it, but to make a new one. This keeps me going drawing portraits one after another. I draw faces of different age and gender, in various points of view, with different emotions.
I created a set of 51 rules of constructive portrait drawing. I teach these rules in the Life Drawing Academy personal tutoring course. Such guidelines greatly help art students to master their portrait drawing skills. I will show you a few pages from this set of rules. The rest is available in the Life Drawing Academy course.

Now, it’s time to make a quick preliminary sketch of Daphne’s portrait. I will do it in pen and brown ink. The purpose of this doodle is to think about the composition. It will be rather simple – a tilted head that is seen in the three-quarter view. I have done thousands of portraits in such a pose, so making one more sketch is a non-demanding task. I can draw a face from imagination. The size of this sketch is slightly smaller than the finished artworks will be, but close enough to appreciate the scale of a future painting. After drawing several sketches, I will fine-tune the final composition and the last sketch will have the same dimension as the encaustic artwork. Such a sketch is called a cartoon. Cartoons are used for transferring drawings onto the support.
While I’m sketching, I can tell a few words about the name of this painting. It will be a portrait of Daphne. In ancient Greek mythology, Daphne was a nymph who turned into a laurel shrub after Apollo touched her. With this spoiler in place, I can now tell the story. According to Ovid, the Roman poet, the story begins when Apollo, a beautiful god of arts among many other things, killed the Python, the great snake by piercing it with one thousand arrows. After such a victory, Apollo sees Cupid, also known as Eros, the god of love, who is usually depicted in art as a young winged boy with the bow. Being victorious, Apollo offends Cupid by saying that archery is not for boys, but men like himself. In response, Cupid hits Apollo with the golden arrow. Also, Cupid shot Daphne, a beautiful virgin nymph with the lead arrow. Different arrows caused different effects – Apollo felt in love with Daphne, while Daphne felt disgust for him. All advances of Apollo to explain his love to Daphne were turned down. She runs away, Apollo chases her and the moment he catches, Daphne asks her father for help and turns into a laurel tree. I’m actually drawing that very moment while Daphne’s face is still human, but her flowing hairstyle turns into the laurel shrub leaves and sterns.
I hope you enjoyed this short story. There are actually several versions of this Greek myth by different authors. I will now finish this quick sketch before making several more and finally transferring the drawing into my album.
Drawing in ink is a fast way to sketch. Every line is applied in full strength and I have to go forward because there is no possibility to erase and redraw. This sketching is a thinking process – I decide how the head is tilted, how the hair is curled, how many laurel leaves there will be and so on.
For making underpainting, I will use Ceracolors. These are special water-soluble beeswax paints. This is where I need to clarify terms. Some painters use the term “encaustic” to any form of beeswax painting. This is an incorrect method. The Ancient Greek term “encaustic” (ἐγκαυστικός) means “burning-in”. The root “kaiein” (καίειv) means “to burn,” implying that heating is required for a painting to be considered encaustic. So, if beeswax paints are applied without burning, the procedure is not encaustic. It is a cold-wax painting. I am placing some Ceracolors paints on the palette using a palette knife. This helps to keep the paint tube neck clean. Wax left on the tube neck will dry solid, making it difficult to remove the cap. That is why, after each usage, you should either wipe off the paint with a paper towel or gently remove it from the tube with a small palette knife.
As you can see, I take a very small amount of each paint. Because Ceracolors dry fast you do not need too much paint on the palette. It is easier to add paints as you go instead of rewetting them especially when paints are drying overnight. This is the Ceracolors Heavy Body Gel Medium. It is also made of beeswax emulsion and water soluble. As with paints, it is better to place just a small amount of this medium because it will also dry quite quickly. Ceracolors are straightforward to use. Although these paints are made of beeswax, they can be diluted with water and used in the same way as tempera or gouache. Aside from water, Ceracolors may be used with specific wax media from the same company.
I now need to explain why I require an underpainting for this picture. Beeswax is naturally semi-transparent. Because of this, beeswax encaustic paints can be semi-transparent or semi-opaque, depending on the color used. That is why if such a paint is applied thinly, the underlayer will be visible through the upper layers. The color of each layer will influence the overall hue of the painted area. This is known as optical mixing. Unlike mechanical mixing, which involves intermixing two or more different paints on the palette or directly on the artwork surface, optical mixing involves layering various colors very thinly on top of each other to create the desired hues. Such application is known as “glazing”. Such an underpainting has to be painted very thinly because there will be hot-wax layers placed on top. I’m making this artwork on paper. Although this paper is rather thick and heavy, nevertheless, it is flexible and for the paint surface to stay without cracking when paper is bent it has to be very thin.
The old masters preferred optical blending. Before the 17th century, no artist used a direct approach to oil painting since mechanical mixing cannot provide the same visual effects as glazing. Optical mixing adds depth to an artwork, giving the impression that you are staring into a true three-dimensional world on a flat surface. Also, glazing is a great way of working on tonal values and creating subtle hue effects layer by layer. So, because encaustic is an excellent medium for optical mixing, and glazing means that under-layers may be seen through top layers, I need a polychrome under-painting to contribute to the colors of this artwork.
It took me months to experiment with numerous mediums, both ready-made and homemade, in different combinations for underpainting. Finally, I decided that Ceracolors were the suitable choice for this purpose. Ceracolors paints are ideal as an undercoat for hot encaustic painting for a variety of reasons. First and foremost, Ceracolors is a waterborne wax-based media. It is made of wax and may be combined with water. This allows it to dry quickly, much like any other water-based media. However, the wax in Ceracolors is the same beeswax used in encaustic paintings. This makes for a fantastic fit.
When the water evaporates, the Ceracolors paint dries, however it is possible to “open it” for a short period by diluting the dried paint with water again. This makes painting simpler. I can revise some portions if necessary. In oil painting, for example, after the paint has dried, the only way to change it is to scrape or overpaint it. Ceracolors will harden after a few days and will no longer dissolve in water. To speed up the process, I may apply heat to such an underpainting, as I shall demonstrate later.
Ceracolors, unlike encaustic paint, will not adhere to practically any surface. This medium requires absorbing grounds. I experimented with different grounds and found that marble dust works perfectly well for that purpose. You can see how I painted a beautiful portrait on such a ground in the video titled “The Best Encaustic Portrait in the Last 2000 Years”.
For this artwork, the challenge is different. I want to see how beeswax paints adhere to the paper surface without any ground. Because Ceracolors are diluted with water, such paint will penetrate into the paper fibers and grip to the surface nicely. At least this is the theory I would like to test.
For optical mixing to reveal its full potential, it is better to use some perfectly white ground. This time, however, I’m painting on the off-white brownish yellow paper. So, the second question I would like to test by making this artwork is how much off-white supports affect optical mixing in encaustic painting. To fully appreciate this question, here’s how optical mixing works. Rays of light hit the paint layer and, since it is semi-transparent, penetrate under the surface, passing through layers of glazing before reaching the non-transparent ground. The whiter the ground, the more rays will reflect off it. After bouncing from the ground, the light rays will pass through glazing layers once more. During this return journey of light, pigment colors will filter and color the white light spectrum. That is why optical mixing may give highly rich and complex colors whereas mechanical mixing won’t. When painting directly, light bounces back off the top non-transparent layer of paint rather than the ground. Such reflection cannot provide the same level of color and value complexity as optical mixing.
However, there are several limitations to optical blending. Each transparent glazing layer will both color and absorb light. This will make the artwork darker with each layer. Furthermore, an expert artist understands that the same multi-layer glazing artwork will seem differently from close up and afar. An artwork will look lighter when seen close up. From a distance, it will appear darker. That is why, when painting, it is vital to step back from time to time and observe how tonal values evolve.
For the underpainting, I want to use only one thin coat of Ceracolors. This layer solely serves the purpose of covering the paper surface and establishing contrast relationships between different colors and tones. Speaking of contrasts, I only want to employ four of the seven contrasts defined and explained in depth in the Colour Theory of the Watercolor Academy course – https://watercoloracademy.com/
The four contrasts are hue, light-dark, cold-warm, and saturation. Although this online course focuses on watercolor, the essential ideas of color theory, color mixing, and various painting styles and techniques may be applied to any color media. This course also includes excellent lectures on 15 compositional components, Golden Proportions, and numerous painting genres. To see what you can learn in this painting course, check out its free demo videos – https://watercoloracademy.com/free
The Watercolor Academy comes with two courses – Online and Correspondence. The Online Course includes 80 video lessons covering watercolor supplies, painting methods and techniques, color theory, composition, golden proportions, genre painting, and more. You will discover professional watercolor painting methods that are not taught in typical art institutions because four outstanding fine painters will reveal their know-how secrets that are not shown anywhere else. The Watercolor Academy Correspondence Course includes all that the online course does, plus special one-on-one tuition from a professional fine artist and art teacher. To begin, your present level of art abilities will be extensively examined, and a unique watercolor curriculum will be created based on your level of talent and needs. This course includes 100 practical watercolor projects, and at the conclusion, you will be a proficient watercolor painter.
If you’re interested in oil painting, the Old Masters Academy is an excellent resource for learning how to paint like the Old Masters with modern materials. This academy also offers two courses: an online course and a correspondence course. The online course is a self-learning programme that includes 61 multi-part video lessons and several bonus videos. The Old Masters Academy Correspondence Course includes a specialized art teacher who will take you step by step, task by task, teaching how to paint in oils in the same style as the great Renaissance and Baroque artists. This course includes 50 practical assignments. Every step will be thoroughly described so that you know exactly what to do and how. Every piece of artwork you create in this course will be constructively critiqued. Your flaws will be pointed out, and you will receive detailed comments with suggestions on how to correct mistakes and improve your artwork. We promise that if you follow our instructions and finish all 50 projects to the required standard, you will be a skilled oil painter by the conclusion of this course. There is no way to fail here since, with our assistance and support, you will take easy measures that will lead to success.
A good artwork is skillfully drawn. That is why, in order to become a skilled color painter, you must first have strong sketching abilities. Because portrait drawing is such a broad field, we developed a unique online video course for fine artists – Life Drawing Academy. In this course, you’ll learn how to draw human figures and portraits professionally. It contains 52 video lessons on classical canons of human body and head proportions, anatomy of a skull and shoulder girdle, instructions and demonstrations on drawing male and female figures from life in various poses, making gesture sketches and long figurative studies, depicting figures in perspective, in-depth explanations on drawing such facial features as eyes, nose, mouth, and ears, and great lessons on how to depict emotions in portraits, how to draw hands, feet, knees, torso and so on.
This is one of the most effective figure and portrait drawing courses accessible on the Internet today. If you want to see what this course is all about, check out the Free Demo video lessons. This course is genuinely unique. It offers a lifetime membership for a one-time fee, but most importantly, it provides personal help from academy tutors, including a review of your artwork. This service is limitless and comes at no additional cost.
If you are serious about getting the advanced level of drawing skills, the Life Drawing Academy Correspondence Course is the ultimate choice. In this course, you will receive personal, one-to-one tutoring from the Academy teachers, which will be custom-tailored to your level of drawing skills. You will discover how to draw realistic figures and portraits from life, memory, and imagination with the necessary knowledge of a human body’s construction, proportions, and anatomy.
Upon enrollment, we will assess your current level of drawing skills. Your art tutors will provide you with a full comprehensive critique of your drawing abilities and advise what needs to be improved. A custom-tailored art curriculum will be created for you. You will receive 100 drawing tasks one-by-one together with detailed instructions that will help you to achieve a greater level of drawing skills. You will learn step-by-step how to draw whatever you see or imagine. Your skills will be assessed as you go task by task. You will know precisely what you have to work on at every step of the curriculum. You will also have unlimited access to all 52 drawing video lessons of the Life Drawing Academy online course.
If you wonder how the Correspondence Course compares to an art college, here is what you need to keep in mind. The traditional constructive drawing methods and techniques are the core of the Correspondence Course. Such techniques are not taught in depth at contemporary art colleges. In a college, you will not get a custom-tailored curriculum developed just As the Life Drawing Academy student, you will have lifetime access to 52 video lessons. It is as good as sitting next to the tutors and watching them drawing in front of your eyes. No teacher at a contemporary art college will ever show you by his own example how to create different masterpieces, giving step-by-step explanations. To study at an art college, you would have to relocate, your schedule would be strict, and you would have deadlines to meet. At Life Drawing Academy, you can study in the comfort of your home, you will have your own flexible schedule, and no deadlines. At a college, your tutoring would be limited. At Life Drawing Academy, you will have a lifetime membership for a one-time fee. At a college, you would get limited support. At Life Drawing Academy such support is unlimited, available for a lifetime, includes your artworks critiqued, and comes at no extra cost. A contemporary art college would take up to 4 years of your time and may cost up to $100,000 including relocation, accommodation, tuition, and other fees. This comes with no guarantee that you will actually learn the necessary trade skills. In the Life Drawing Academy Correspondence Course, we guarantee that you will reach the advanced level of drawing skills should you complete all 100 drawing assignments with required quality. Every task will be given only after you complete the previous one. You will progress from simple assignments to more advanced topics gradually, learning all you need to know step-by-step. Skills you learn in one task will be needed for the following ones. Your personal tutors will guide you from task to task, so there is no way to fail as long as you follow what we teach.
I am now painting the laurel foliage from life. It is not about making the exact copy of every laurel leaf, but to give an impression of the hairstyle turning into vegetation. When depicting greenery, there is one good tip that will enhance your painting skills – it is better to mix your own green colors by combining yellow and blue hues instead of taking and using a green paint as it comes from the tube.
To become a skilled portrait artist, you must also have a solid understanding of human anatomy. To assist artists like you, we developed the Anatomy Master Class. This course includes a lifetime membership and allows you to study at your own pace. This course does not utilize Latin names and just covers the relevant anatomical characteristics. So, you may study anatomy quickly and easily. To see what this anatomy course is about, check out its free demo videos.
To make this portrait glow, I will create a high contrast between the light face and dark background. This underpainting is developing nicely. I already like the result. Even though it is not finished, it appears as a complete artwork. The colors are fresh and vibrant and it is totally possible to leave this piece as an underpainting. However, my creative task is different. I will use this polychrome underpainting as the foundation for hot encaustic painting. My experience in encaustic proves that good underpainting is essential for getting great results. Because beeswax paints are semi-transparent, such an underpainting will glow though the top layers of wax and create very special optical effects. So, I will continue painting in Ceracolors to complete this underpainting with every detail, contrast and color as needed before advancing to the next important step – encaustic painting. The underpainting is complete. I will emboss my signature in the corner. This artwork has been drying for several days, and now I’m going to heat up the Ceracolors underpainting with a heat gun set to 150 degrees. This will melt the beeswax and permanently bond it to the paper surface. This portrait is now ready for hot encaustic painting.
For hot encaustic painting, I will be using this electric brush. Its temperature can be adjusted with one degree increment. This brush takes only a few seconds to reach the wax melting temperature. Here you can see DIY encaustic paints. Such paints are made of different color powder pigments and the binder, which consists of specially modified beeswax, colophony resin, a little bit of linseed oil and one more secret ingredient that raises binder’s melting temperature and improves its physical characteristics. The precise formula is my know-how and I have to say that making such paints is not an easy task. It takes about six months for the binder to become ready for painting.
Many painters use turpentine to paint with beeswax. There is an issue with this type of solvent. Wax paint mixed with turpentine must be applied very thinly and cured for many days to allow the turpentine to evaporate entirely. If this solvent does not evaporate completely, it will transform into turpentine oil. Such oil hardens beeswax and causes paint to disintegrate and peel off over time. This is not the desired outcome. On the other hand, if you follow the instructions and dry each layer well, you may be able to avoid the turpentine oil problem, but the procedure will be very slow. That is why I do not use any turpentine with wax paints.
The painting process is difficult to say the least. The brush only takes a small quantity of melted paint, which is then put to the board. Hot wax adheres to the surface well. It combines with the Ceracolors underpainting to form an inseparable layer. The dark colors I’m using for the background are Ultramarine Blue and Phtalo Green. Both these paints are transparent. On their own, without a dark underpainting, it would be very difficult to achieve dark even color with transparent encaustic paints. It is possible, but such a paint layer would be rather thick. Because I am painting on paper, not on a board, the paint layer has to be thin, that is why this artwork requires underpainting. Because encaustic paint contains some resins, the painted surface is a bit shiny. It also holds the texture of brushstrokes very well.
Encaustic is one of the most quickly drying mediums. Every brushstroke dries in less than two seconds. Paint remains liquid on the heated brush and hardens nearly instantaneously when taken from the artwork. This makes painting quite difficult. It demands a great deal of practice and experience. Here is the selection of green and yellow encaustic colors. I will use these paints for burning in the laurel foliage. Yes, you heard this right. The proper term for applying encaustic paints is not painting, but burning in. This is what makes hot beeswax painting encaustic. Each brushstroke must be considered, prepared, and executed with care. Encaustic is not a forgiving medium. It might be quite difficult to correct errors. It is absolutely not a medium for “loosening up and expressing yourself” without first preparing and knowing what you are doing. The incorrect color might ruin the effect. It would be very hard to remove such a color without causing damage to surrounding places. Every step requires a thorough calculation. For example, the temperature and duration of contact between a brush and the artwork surface yield diverse outcomes. Textured and lustrous brushstrokes can become drab and dissolved in just a few microseconds of touch. Fine motor skills are quite important in this situation. Timing relies on muscle memory and eye-hand coordination. We cannot measure microseconds by counting, hence the skilled hand must do it. As you can see, the electric brush is heated to 186 degrees Celsius. This high temperature can easily burn the skin, so when handling this brush, I take utmost care. Once again, good green colors are obtained when mixing yellow and blue hues. Green paints are very transparent. In combination with the underpainting colors, glazing layers produce very nice optical mixing.
Encaustic medium is perhaps the greatest binder for paints, but it is also the most complex to create and use. Ancient painters were aware of this. We do not know when encaustic was invented, but Vitruvius, a Roman architect and engineer, mentioned the “Punic wax” in his book “De architectura” in the first century BC, and Pliny the Elder, a Roman author, philosopher, and military commander, described it in his book “Naturalis Historia” in 77 AD. What is so great about Punic wax, and how does it relate to art? It is a carefully processed beeswax that is triple-boiled in seawater with a high concentration of sea salt and sodium carbonate. After boiling, the wax must be cured for several months. This process cleanses and purifies the wax, lowers fatty acids, and boosts the melting temperature. In addition, it is bleached throughout the process, making it appropriate for encaustic paintings and protective ganosis.
The paintings in this video are produced with this wax. Encaustic media is commercially created and sold, but I had to prepare it myself due to the poor quality of ready-made ingredients. First and foremost, producers bleach wax chemically rather than organically over a 6-month period. Second, to become a proper medium, it must be melted with colophony and linseed oil. The medium on the market is combined with a dammar resin.
I use a variable proportion of rein to wax and include a secret ingredient that increases the qualities of the encaustic media. Needless to say, creating such a custom-made media is neither simple nor quick. Nothing looks easy when it comes to encaustic painting. I spent several days preparing the medium, then waited half a year for it to harden and turn white, before spending weeks producing colors. I must warn you that if you utilize the incorrect materials, this activity might be harmful to your health. Some colors are hazardous, while others become toxic when heated. Such pigments are unsuitable for encaustic.
Do not mix your own paints at home unless you have a thorough understanding of pigments and which are safe to use. Additionally, vapors from beeswax and resin are harmful to your health. To summarize the disadvantages of encaustic, it is expensive, difficult to make and use, and unsafe for human health. Otherwise, it is an excellent medium for painting, mastering which provides immense delight. To show you the progress, I will turn this artwork at different angles, so you could see the areas painted in encaustic. You can see in this color chart that some paint swatches are very transparent while others are opaque. To over-paint light on dark, I have to use opaque paints. I’m currently painting with a very fine brush to achieve the accuracy needed for minute details. This artwork is progressing nicely. I like the results. The encaustic surface is shiny, textured and pleasing to touch.
It’s time to paint the face. I will use yellow, white, orange and pink encaustic paints for this purpose. There is quite a selection of prepared tints and shades in warm flesh colors. When it comes to transparency of paints, this chart will be very helpful. There are 105 swatches here and it is easy to see which paints show the underlying black stripe and which paints cover it. The colors and tonal values of the girl’s face are already in place. I solved this question by making an underpainting. This underpainting makes the encaustic burning-in easier. I do not need to establish hues and contrasts, but simply enhance colors and create picturesque optical mixing effects by painting in encaustic on top. As you can see, the underpainting is really useful in determining which colors to use and how to cope with chiaroscuro, which is a bright and dark balance. Because encaustic is semi-transparent, the colors in the underlayer contribute to the hue range of this artwork. The underpainting is quite precise; it does not clash with the realistic manner of the wax overpainting, but blends with it. Different layers complement each other, making this artwork more engaging.
I want all of my encaustic artworks to be recognisable. A personal style is what distinguishes one artist’s work from that of another. I think that what I’ve learned about encaustic over the years and accomplished in this medium distinguishes my work from other artists who paint with heated beeswax. I also hope that the next time you encounter my encaustic works, you will be able to identify who painted them.
My goal is simple to describe but extremely complex to realize. I wish to outperform all known ancient portraits in terms of quality and expertise, as well as all current encaustic portraits. To put it simply, I aim to create the finest encaustic portraits of the past 2000 years. I understand that this is a lofty ambition, but as one of the greatest artists of all time, Michelangelo Buonarroti once remarked, “The greater danger for most of us lies not in setting our aim too high and falling short; but in setting our aim too low and making our mark.” So, even if I don’t succeed in creating the finest encaustic portraits, I’ll be proud of the effort. My purpose is simple: I want to resuscitate the best traditions of life-size hot-encaustic portrait painting for the twenty-first century, leading in a new age of modern “Hellenistic Fayum” portraiture. My perspective is that art’s goal is to capture the beauty and significance of life. That is why I regard my purpose as exposing people to the true worth of traditional great art. I wish to carry on the traditions of the old masters. That is why I teach my art students how to create their own unique creative style using the rich tradition of artistic know-how and expertise.
Several names of encaustic painters can be found in old publications. For example, Zeuxis from Heraclea was a Greek painter active between 420 and 380 BC. According to legend, he became one of the wealthiest individuals due to his artistic abilities, so much so that no customer could purchase his creations; as a result, he donated them as gifts to towns to be displayed for all to see. Talented artists of the era were extremely proficient experts. To become one, a youngster had to study for ten years, and such education was extremely expensive. Pamphilus, a painter and art instructor from Sicyon, for example, charged his students, many of whom went on to become well-known artists, one talent worth around 33 pounds of gold. At today’s price of $2,000 each Trojan ounce, this would be more than $2 million over ten years. So, one of the things a master would ask a parent of a child who aspired to be an artist was, “Does your son have talent?” This was a query about tuition rates, not talents. If a dad decided to invest such a large amount of money in his son’s education, he would do so with the expectation of receiving a high return later. Apelles, a well regarded Greek painter in the fourth century BC, was one of Pamphilus’ students, as far as we know from recorded reports. Unfortunately, no easel paintings from that era have survived. Here’s how Zeuxis and Apelles competed with one another. When Zeuxis painted grape bunches, birds flew to nibble at them; when Apelles painted horses, actual horses neighed at them. We’re not sure if it’s genuine, although other sources cite pricing for encaustic work during the period. When the king of Egypt offered Nicias, a painter from Athens, 60 talents, or more than 127 million dollars today, for his representation of one of Homer’s stories, the artist rejected and instead presented the masterpiece to his hometown. Tiberius, the Roman emperor, paid artist Parrasius of Ephesus 6 million sesterces for a picture of the senior priest, which was equivalent to over 5,000 legionaries’ annual income. Another emperor, August, accepted an Apelles picture in lieu of the city’s tax payment of 100 talents. At the current gold price, this equates to $213 million. I believe we can trust numerous accounts with such high art values because they are from various writers.
Great art made fortunes for the most important Greek and Roman painters, and such art was only possible because ancient artists possessed exceptional painting abilities and a thorough understanding of the encaustic process. I wish we could see what the art before Fayum portraits looked like. Because the oldest encaustic portraits known today were made 400 years after the period of Zeuxis and Apelles, we can only assess ancient easel painting based on artifacts created when abilities declined. Nonetheless, Fayum portraits provide a wonderful model to be inspired by. That is why, in my pursuit to create the finest encaustic portraits, I can only compare my work to portraits created during the previous 2000 years.
By the way, if you want your portrait done in encaustic, you may commission one by contacting me on this page: https://vladimirlondon.com/contact
Getting a hot-encaustic portrait is neither inexpensive nor quick. There are a few causes for this. Creating such a portrait takes time. For modest artwork, allow one month or more. Furthermore, preparing high-quality paints takes six months. If you order when I have adequate supplies, you will save time. I exclusively use high-quality encaustic paints that I create myself. I am confident they will last as long as the old Fayum pictures did – for the next 2000 years. In addition, the painting process will be filmed, and along with the encaustic masterpiece, you will receive a step-by-step presentation of how it was done. You can also purchase exclusive rights to such a video. If you choose, you may negotiate the copyright.
I finished applying encaustic paints, but the burning-in process is not complete yet. To fuse all layers into one inseparable coating, I will heat the surface with the heat-gun. This is a very delicate process. Too much heat will melt the beeswax medium and ruin this masterpiece. So, it has to be done with the utmost care, applying just enough heat for paints to fuse together, but not too much to melt down. After the surface cools, it becomes very hard. It is also water repellent. To make it shiny, I will buff it up with a soft cloth. The front of this artwork is done. It is shiny and beautiful. Now, it’s time to take care of the reverse side. I want this work to last for many years. Because it is done on paper, I want to protect it from humidity from both sides. A special wax coating is applied on the reverse side. This stuff penetrates into the paper fibers, making paper water resistant. To burn in the wax medium, I will heat the surface with the heat gun. It has to be done with care not to overheat this sheet of paper because it might damage the artwork on the front side.
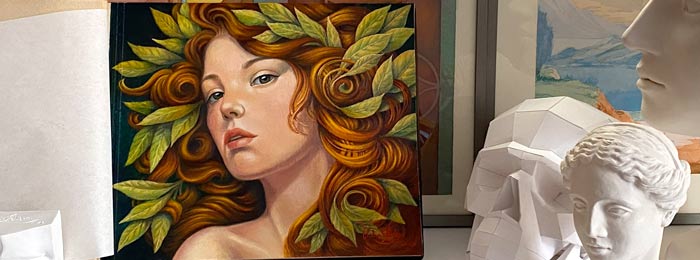
Finally, the portrait is complete. Here it is, with my paintings and sculptures. The video camera does not depict how it appears in real life. This image glows from within, and the skin appears so lifelike that you could touch it and feel its warmth.


