Question from Collayne Mills
Hi Vladimir,
Please let me know how to approach photo reference for drawing in perspective.
The new release tutorial on perspective is a great overview. I have been working on this skill. I made an Albertian perspective box, using a photo-frame with a wide flat wooden frame that can sit on my desk. I inserted a ten inch grid on a piece of acetate behind the glass. I looked through that, sighting with a vision marker and drawing on another matching grid with a piece of tracing paper overlay, marking off what I saw – slowly but surely. And I’m referring to some of my reference photos and attempting to put them into construction drawing.
 I would like the fox to look at the viewer. And, of course, I’ll draw the tail.
Do I have the horizon line above the fox, or can I move that to a horizontal across the eye line to the tail, and the vertical line through the right eye to bring the image closer?
Do I place the whole fox in a box, or can I improve the head with a separate box?
Thank you for your wonderful drawing program and updates. I hope all is well with you. It is much colder in Canada, so it is good to snuggle in and draw.
Best regards,
Collayne Mills
Hi Collayne,
I’m glad you found the video on perspective useful.
You mentioned the Albertian perspective box. Strictly speaking, the Albertian perspective box should be called the Albertian grid box, and as such, it is a tool of copying three-dimensional objects square-by-square on a flat surface.
To be honest, I never used it, as my art teachers always advocated using only essential equipment such as an easel, pencil, and eraser. An artist’s eyes and hand are the most comprehensive tools a fine artist can rely on. If you want to develop your drawing skills, it would be great to make multiple fast and long sketches, thus training your eyes and hand. Making sketches from life and nature is the best teaching experience you can have. Think about drawing as a skill that cannot be taken away. You might not have access to a perspective box or other tools, but still be able to draw whatever you want, or imagine from your memory or imagination. It takes a lot of practice, and the process of learning drawing might not be fast; however, the liberating ability of having good drawing skills becomes so useful in expressing your thoughts and ideas without tools or photo references.
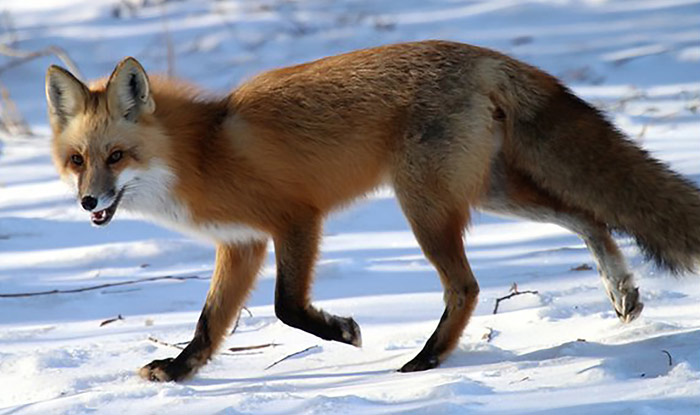
In regard to the fox drawing, I would suggest not to over-complicate things with perspective.
I have a feeling that we might use different definitions of perspective. Drawing in perspective is not the same as constructive drawing. Perspective deals with how we see objects’ sizes, depending on the distance from the viewer and how objects are foreshortened depending on the point of view.
The fox’s nose is foreshortened, while everything else is more or less un-distorted and is seen in a one-plane view. There is no vanishing point(s) is required here, as the depth of the fox is insignificant from this point of view.
Constructive drawing is how a fine artist is constructing a drawing step-by-step, going from drawing layout/composition, to big masses, to smaller masses, and then to details; drawing or comprehending objects as if they are transparent; meaningfully depicting or keeping in mind an object’s shape, planes, edges, corners, outlines, and contours, comparing parts of an object to each other, measuring angles and distances. Rules of perspective are an integral part of constructive drawing.
To explain a constructive drawing on the fox’s example, I would make a drawing in the following steps:
1. Decide on the paper layout – horizontal for example.
2. Envision the completed drawing – how it will fit the chosen paper size and layout.
3. Plan the overall dimensions of the fox sketch; mark out most points of the fox’s length and height; measure with a pencil how many times the length is bigger than the height.
4. Measure by eye/pencil proportions of the fox’s head, neck, body, and tail; mark those proportions on the drawing (check how many times the body is longer than a head, what is longer – the body or the tail, how many times the head/body/tail fits into the total height, and so on)
5. Define the thickness of the fox’s body and the angles of its back, neck, tail, and legs; compare the angles to each other. Use imaginary lines that virtually continue from one section of the , for example. Where will such lines cross the back? Where will the top and bottom lines of the neck cross the lines of the body? Is the angle of the belly as steep as the angle of the tail? How long is each section of each leg? How wide/narrow is the leg in different points? And so on…
6. Imagine the fox’s skeleton inside. You don’t have to draw it; however, making several sketches of an animal skeleton will greatly help you to understand its construction and draw more realistically. Where are the fox’s legs connected to the skeleton? How many main bones (that affect the appearance of the leg) are in the front and back legs? Does the tail on the drawing look like a natural extension of the spine? And so on…
7. Define smaller masses. What is the shape of the body, head, neck, tail, and legs? How do outlines flow from one point to another? Are there any sharp angles or smooth curvatures? Are outlines convex or concave?
8. Draw as if the fox is transparent. How is the right-back leg connected to the body, for example?
9. Define smaller details. What is the shape of the fox’s eyes? What is the distance between the eyes? How big/small they are compared to the nose/head? What are the angles of the fox’s head/face features? All points 3 to 8 above now can be applied to the fox’s head.
10. Continue with small details – legs’ shapes, ears, patterns of the fur, contours, lines between light and shade. Compare every element to another, and do not concentrate on a single spot for a long time, so that you keep your perception fresh.
11. When working on shapes and contours, do initial markings of the darkest areas of the fox. Shadows come first; define those areas in pencil/pen hatching. Work in a way that, if you stop at any point, the drawing will look complete.
12. Develop tonal rendering further. It goes from big masses to smaller masses to details, and then back to big masses. I will keep tonal rendering talk short, as this explanation illustrates the constructive, rather than tonal drawing.
As you can see here, a fine artist relies on eyes and hand in constructive drawing. If you imagine or dream of a beautiful house or castle you want to draw, you will not a have a photo reference or real object to copy square by square from. That is where your ability to draw constructively will be imperative.
I hope this was helpful.
Thank you very much for your kind words about the Drawing Academy course.
Best regards,
Vladimir


I especially like your method of drawing because you can use it, as you stated, with images from your imagination and from dreams etc.