Discover What is Silver-Point
In this video lesson you will discover “What is Silver-Point”, including silver-point drawing tools and silver-point drawing techniques.
Enroll in the Drawing Academy Course
Pay once - Enjoy forever!
Only $297
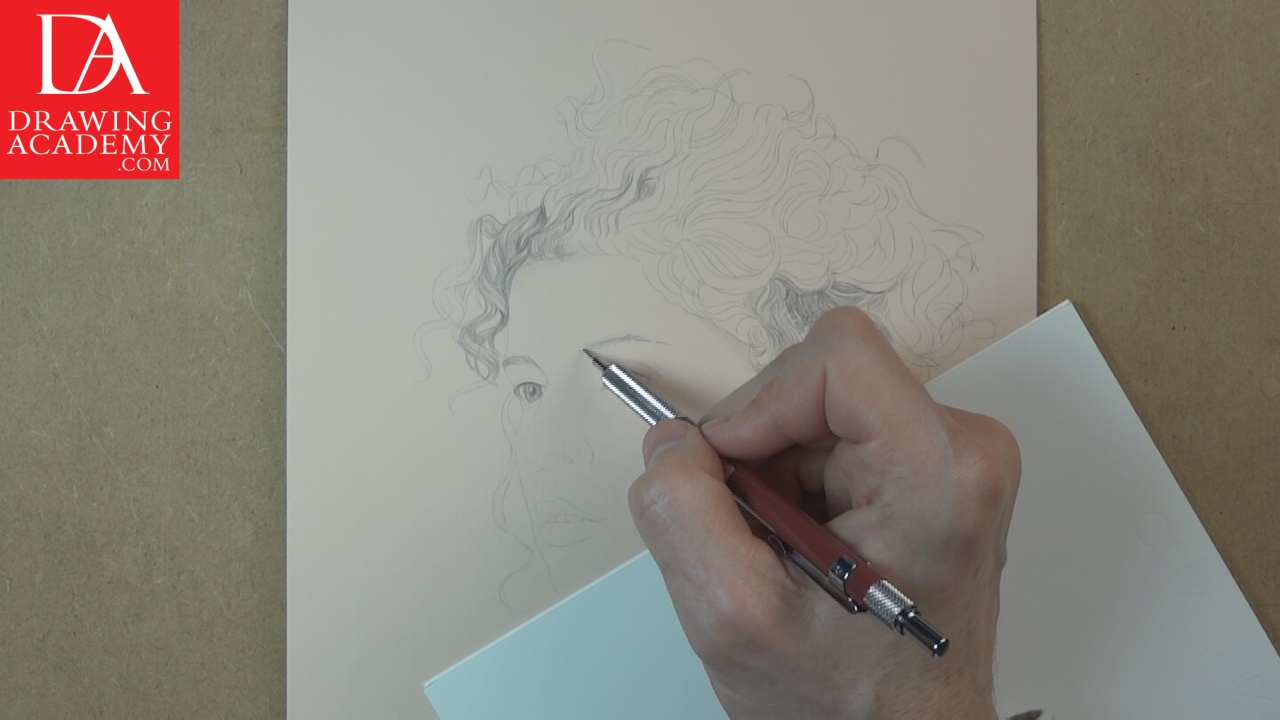
What is Silver-Point – Drawing in Silver-point
The silver-point begins with easy and delicate strokes of the stylus. The pressure on the drawing instrument must be minimal to protect the paper coating from scratching. I am starting with the darkest place of on the drawing. This is done intentionally to test the darkest achievable tone. All other tones of the drawing will have to be lighter.
The direction of the silverpoint strokes goes along model’s contours. Every line is very thin but clearly visible. It takes many layers of silverpoint to build up the tonal value required.
Silver-point Pen Grip
Talking on the subject of “What is Silver-Point” pen grip, keep in mind that with correct handling, the silver-point mechanical pencil is supported by the third finger from below, pushed down from the top by the index finger and pressed by the thumb from the side.
This pen grip was perfected by many generations of calligraphers and artists and as such, it is the reason why this pen grip works so well. The human hand moves like a mechanism with levers and hinges. Correct hand positions insure correct hand movements.
Using this grip, while extending and contracting three fingers holding a pen, makes the pen-tip go along the writing surface. The tip just slides in parallel to the paper.
Changing the grip or turning the pen handle away from the shoulder will cause the tip movement to change drastically. It will no longer effortlessly slide along the paper surface; instead it will make curved movements up and down. Some additional correcting of the hand movement is required to keep the pen on the paper. This affects the quality and precision of the lines.
Protecting Silver-point Ground
When drawing on the silverpoint ground, protect the paper surface by placing a clean sheet of paper under your hand. The gouache ground is very delicate and can be easily blemished by contact with skin. No matter how clean skin is, it always has on it natural oil, which aids in keeping it soft and flexible. Human skin also evaporates water all the time. These fumes can be damaging to the water-absorbent gouache ground after prolonged contact with skin.
Rendering in Silver-point with Precision
Silverpoint is a great tool for depicting such small details; this is especially handy when drawing facial features of a model. The beauty of silverpoint is the accuracy of details of which it can produce.
Drawing Hairs in Silver-point
When it comes to drawing hair in silverpoint, this media fits the task very well. Of course there is no need to achieve a photographic realism when drawing hair, unless you want to. On the other hand, one of the common mistakes when drawing hair is not placing enough attention on this part of a portrait. Amateur artists tend to make two kinds of mistakes. First, they try to draw every individual hair and become lost in such a massive task. Another mistake is, they pay too little attention to a model’s actual hair and tend to scribble various lines in any direction just to fill the place.
Both of these approaches are erroneous. The mass of hair on the portrait, like any other 3-dimensional element, has its volume and shape. Therefore, such mass has its light and dark places, light changes from the high light to mid-tones, then to shades and sometimes to cast-shadows. Think of a hairstyle as a piece of foam that has well-lit and shaded areas. Use your drawing tool to depict those areas as you would on a solid object. The direction of silverpoint strokes should go along the hair flow. Make the gaps between strokes a bit wider and the pressure on your stylus a bit stronger and you will achieve the desired effect.
I think the main difficulty when drawing hair is our understanding that hair volume consists of separate individual hairs. So, the amateur artist tries to draw individual hairs applying the same pen pressure and tones.
As soon as the artist realizes that a hairstyle is just another big 3-dimensional mass with its own texture and chiaroscuro of light and shade, the drawing becomes more realistic and believable.
Of course, a big mass of hair can have separate smaller curls that are also 3-dimensional masses with their unique volume and chiaroscuro. In turn, such curls can consist of several smaller curls, and so on. The main rule here is to start from big masses and progress to smaller details. Going in the reverse order might present challenges of unifying the hair mass into one realistic-looking mass.


