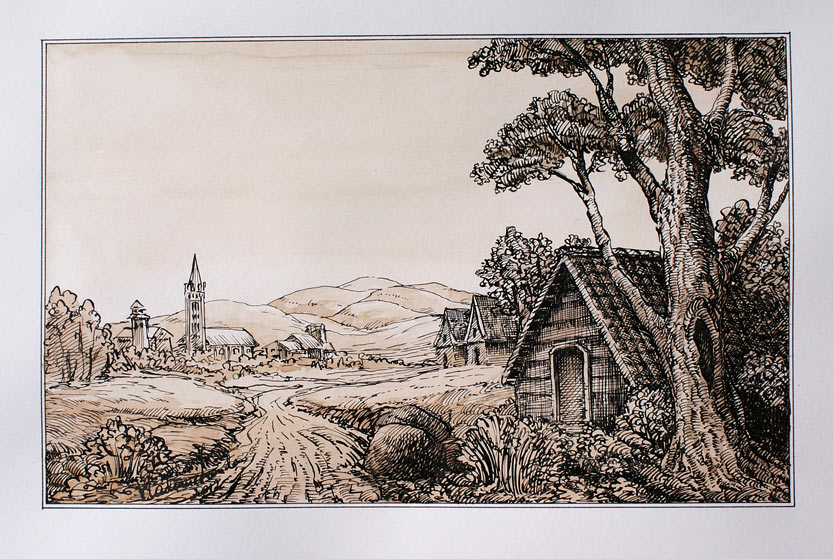
Discover How to Draw Trees in Black Ink
In this video lesson, you will discover How to Draw Trees, making an artwork in black ink and brown watercolour wash.
Enroll in the Drawing Academy Course
Pay once - Enjoy forever!
Only $297
Drawing in Pen and Ink
When it comes to the “How to Draw Trees” subject, drawing in pen and ink is a great way to practice and improve your drawing skills.
It requires more discipline than drawing in graphite pencil. In ink drawing, it is much harder to correct mistakes; you will be concentrating more on the quality of lines. This also applies to shade rendering techniques, once the tone is rendered to a certain value, it is next to impossible to revert it back to the lighter value. So, drawing in ink trains your hand as well as your eye.
Precision of line strokes comes with practice and visual judgement of tonal values will also improve with time spent on drawing in ink.
How to Draw Trees – Ink lines gamut
When you consider how to draw trees, keep in mind that all lines for natural objects like trees, grass and land are curved and done in free-flow pen movements. They say that nature doesn’t have straight lines. Man produces all straight lines around us.
The roundness of ink lines compliments the organic nature of depicted objects, which is quite important for this “how to draw trees” exercise. This drawing has a wide gamut of lines, as landscape drawings tend to have. It is a very different approach to let’s say a still-life drawing, where objects are manmade and therefore, mostly geometrical.
In this “How to draw trees” video lesson you will see that the organic shape of trees’ foliage is mostly done in curved ink lines. According to the aerial perspective rules, the background objects have less contrast and can be drawn with just a few details.
The trees in the foreground are much closer to the viewer than the trees in the background and therefore, require a much more detailed drawing approach.
I’ve rendered the foliage with more attention to small details like groups of leaves and branches.
How to Draw Trees – Employing the Right Pen Grip
When it comes to the “how to draw trees” topic, keep in mind that to achieve good results the correct pen grip should be used. For this drawing I’m employing the classic pen-holding position – as if for handwriting. Three fingers hold the pen. It is supported by a third finger, pushed down by the index finger and from the side with the thumb. The pen handle must be pointing to the writing hand’s shoulder.
To check how it works, try the following experiment. Point the pen handle away from the shoulder and bend three fingers with the pen. The pen doesn’t go in parallel to the drawing surface; instead the nib lifts up in a curved trajectory. You need to make correcting movements just to keep it on the paper.
The correct pen-grip allows you to effortlessly keep the same pressure on the pen along the full length of the line. It is just happens automatically! So, if you need to practice the correct way of holding the pen, now is the time to start.
How to Draw Trees – Atmospheric Perspective in Ink Drawing
The atmospheric perspective is very important for landscape drawing. Rendering in ink also follows aerial perspective rules. Objects in the foreground are rendered in more detail and with greater contrast than objects in the background. However, you can make some exceptions to this rule. For example, in this drawing the closest thing to the viewer is the ground with some grass and stones. At the same time, they are not the main objects in this drawing. That is why I will purposely draw the front building with more consideration so the viewer’s gaze will be drawn to that building.
The watercolour wash will help to soften the monochrome ink drawing and also will add a more atmospheric perspective appearance.
How to Draw Trees – Linear perspective in Ink Drawing
This drawing’s composition also contributes to linear perspective, which takes this drawing closer to three-dimensional reality. There is a road in the middle of the drawing that points to the small town far in the background. The trees on the left hand side of the picture have the skyline sloping to the right, which adds another virtual tilted line that goes into the vanishing point. Buildings and the big tree on the right hand side also form several tilted lines directed toward the vanishing point.


