Drawing in Colored Pencil – Life Portrait in Red Pencil
In this video part of the “Drawing in Colored Pencil” you will discover how to render shades in coloured pencil.
Enroll in the Drawing Academy Course
Pay once - Enjoy forever!
Only $297
Drawing in Colored Pencil
When drawing in colored pencil and rendering shades, we need to consider how structural elements of our drawing compile the big mass of the head. To do that, you can subdivide the big mass of the head into smaller structural elements. So, for example, a nose can be simplified as a prism and the chin as a half-sphere, and so on. When you have the general understanding of such elementary elements, it is much easier to think how light works on the facial surface and where shades are.
Mid-tone values of the face are rendered in multiple layers of hatching with a very easy pressure on the pencil. For lighter pressure, I hold the pencil further away from the tip.
Drawing in Colored Pencil – Rendering Strokes direction
The direction of rendering strokes goes along the face contours. Contours are imaginable lines that characterize the shape and volume of the object. Hatching along contours helps to reveal the three-dimensional character of the head on a two-dimensional flat surface of the artwork.
Drawing in Colored Pencil, I am keeping my pencil sharp at all times. The watercolor paper has a well-pronounced rough texture and the pointed tip of the pencil is able to go up and down into the small indents on the surface.
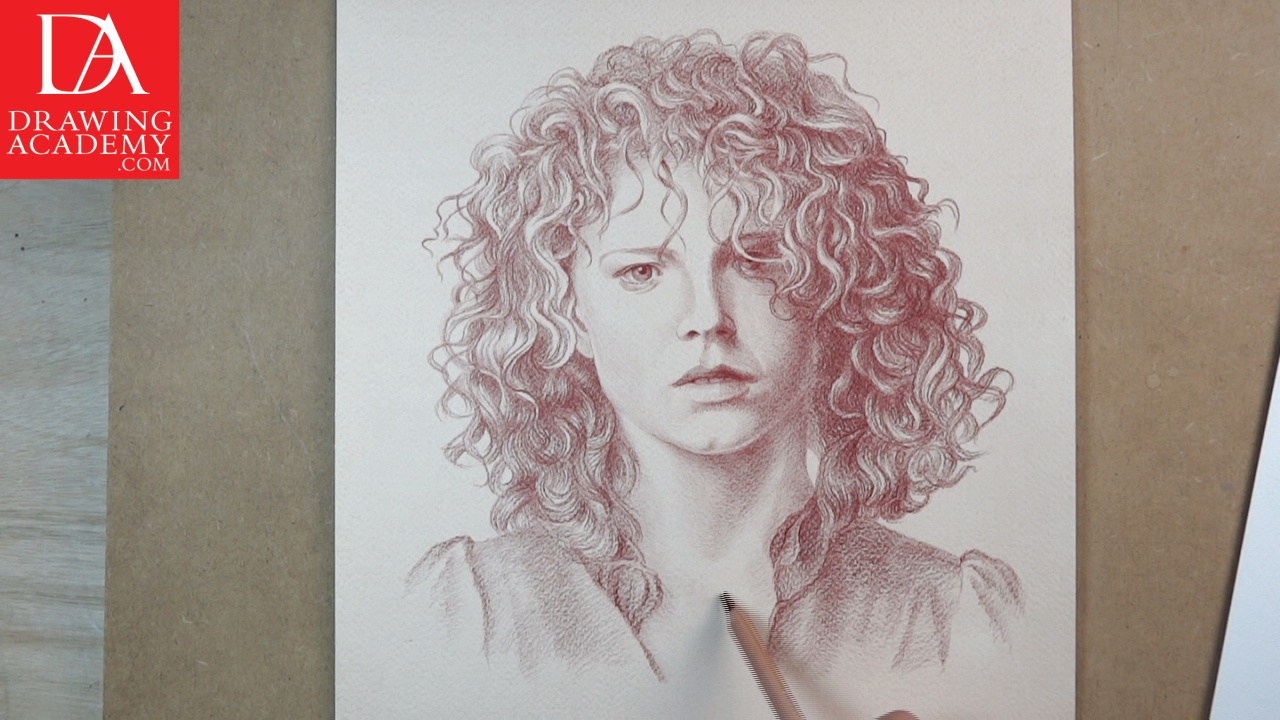
I am using various directions of the pencil strokes in this Drawing in Colored Pencil. Although it is possible to make a tonal drawing in a single direction of lines, it would look more artificial. I saw one fine art instructor who did not master the skill of line variety. He rendered shades in a uniformed direction of the main diagonal – from the top-right to the bottom-left direction. The results were very mechanical and lacked expressiveness of the form.
Needless to say, that a professional draughtsman must know how and be able to use the drawing tool by making strokes in pre-determined and varied directions when Drawing in Colored Pencil. A professional drawing will benefit from the variety of directions; including: vertical and horizontal, both diagonals as well as a combination of straight and curved lines. Such variety of line directions is called: Gamut.
Gamut in drawing is as important as in music. Sound can be made with repetition of a single note, while beautiful music requires the whole range of notes. So, do not limit yourself to one particular direction of lines. The wide gamut in drawing requires various linear directions that describe, on the flat surface, the three-dimensional world. On the other hand, do not attempt to widen your drawing gamut by intentionally drawing lines in random directions unless you do a close-up of a haystack. Use common sense of the economy of directions that produces unified cohesion of the depicted object in a realistic manner.
When Drawing in Colored Pencil, The meaning of gamut is also applied to other characteristics of lines, like their weight and curvature. It is also applicable to the tonal range of the drawing.
The combination of line directions, weights and the tonal range in one part of the drawing can be echoed in other areas of the artwork. This will give unity to the drawing.
This also applies to hatching when it comes to Drawing in Colored Pencil. Hatching in only parallel lines, even though in various directions, will not look the same as a combination of hatching and cross-hatching; when two or more layers of hatching are applied in different directions over each other.
How to draw hairs
Drawing hair is a challenging task for some art students, especially when Drawing in Colored Pencil. I think the main difficulty starts from misunderstanding the hair mass. Imagine that the whole hairstyle is one big mass with its volume and shape. As a unified mass, it has light, mid-tone and dark tonal values. Now this unified mass can be subdivided into smaller groups. Every group will have their own lighter and darker areas. Furthermore; even smaller details can be analyzed, like individual curls, for instance. Those curls also might have highlights, shades and cast shadows.
There are two common mistakes you’ll want to avoid when Drawing in Colored Pencil such thing as hair. First, do not attempt to meticulously draw every individual hair. Second, do not scribble with pencil in all directions making a “wire wool” or “haystack.” Instead, use the natural direction of the hair-flow as a guide along which you can apply pencil strokes. Strokes can be curly or straighter, depending on the individual’s hairstyle. These pencil-strokes do not represent the individual hairs, but reveal the form of the hair mass and how light bounces off it.
It might not be an easy task for a beginner to draw the whole complexity of hair curls that our model has. The hair mass can and should be simplified. After all, it is just one single mass you need to keep in your mind. With this being said, I know precisely what the end result should look like and progress with confidence, rendering hair. If you feel this task is too intimidating, then by all means, use another approach. You may start from rendering the overall mass in broad, light strokes to achieve the unified feel to the hair shape and then go for smaller details.
Drawing in red pencil and chalks
The red pencil used for this portrait was not available to the Old Masters as a drawing media. It is engineered from contemporary chemical materials and contains red pigments that are smooth on paper and uniform in color and therefore, well-suited for the task.
At the time of the Old Masters, natural chalks were used. Natural chalks can be found in the earth in the form of clay or similar deposits. Red chalks receive their color from the iron oxide – one of many very common elements – found in the ground. Drawings tools were made of chalks mined from the ground, which were then, cut or sawed into pieces. The earth chalk consistency is not as pure as today’s modern pencils; Therefore, the task of rendering shades would have been even more challenging when an artist had to predict the tone a chalk would make. Today, artificial red chalks can be made of ground chalk powder mixed with binder.
One of my most favorite red pencils is simply called, Red Chalk. It has high consistency and a brilliant, natural, red earth color. Above all, it produces smooth, velvety lines while being resistant to becoming blunt too quickly.
Red chalks have been used since ancient times. The red chalk technique had developed to its peak during the late Renaissance. Various red chalks, including sanguine, are great for depicting the warm colors of human skin and less so for landscapes and seascapes. That is why I decided to use red pencil for this portrait drawing.
Chiaroscuro technique
The term, Chiaroscuro, stands for, “light-dark”. It came into use at the end of the 17th century. At that time, the word chiaroscuro was used to describe the contrast between light and dark tones in drawing or painting. Later on, it acquired several other meanings apart from contrast. It also means, “the tonal variations and reflective quality of surfaces.” English fine artist, Constable, also attributed to this word, the meaning of aerial perspective with light and shades across the landscape.
In broad terms, the word chiaroscuro is used for the description of the light and shade contrast and gradations of tonal values, which are used to portray forms of objects usually under dramatic lighting.
Drawing in Colored Pencil is usually regarded as a monochrome medium. However, two or more colors can be used. For this portrait, I use two colors – yellow-orange color for the background and the red color for the portrait. The red pencil is particularly suited for the red-haired model’s portrait; it complements the natural look of the model.
Great art has its foundation in great drawing. Mastering drawing skills is an essential part of becoming a great artist.


