Discover How to Draw a Horse
In this video lesson you will discover How to Draw a Horse in a realistic manner.
Enroll in the Drawing Academy Course
Pay once - Enjoy forever!
Only $297
How to Draw a Horse
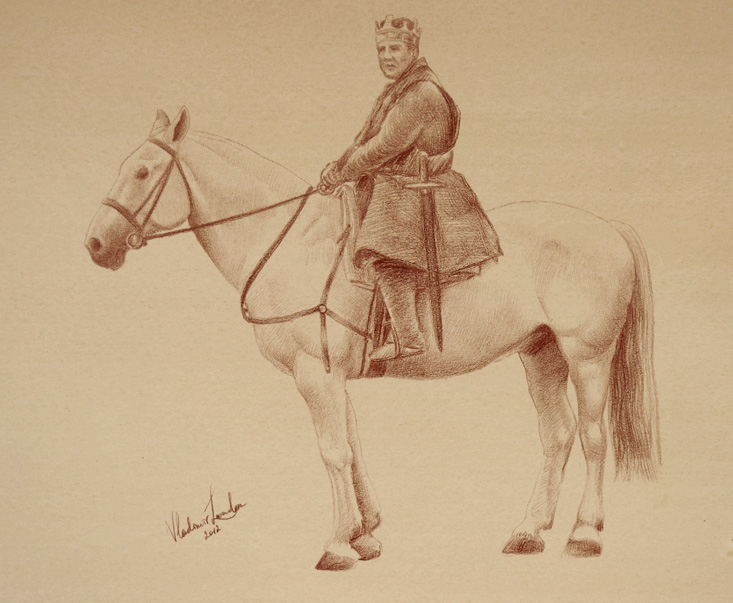
This horse drawing artwork is done in realistic style. It is intended to be an illustration rather than a highly rendered creative drawing.
The Luminance 6901 Perylene Brown 585 red pencil is used in this “How to Draw a Horse” video lesson to show you how to draw a horse. This pencil is oil based and very difficult to erase. Therefore, the drawing outline has been transferred onto the paper beforehand.

The white horse will look white even though we are using the red pencil on toned paper. The tonal contrast between the horseman and the light areas of the horse’s skin will create an illusion of the horse being white. Of course, it is possible to use white pencil or chalk to highlight the tones of the horse, but I will reserve this for the red pencil only – to show you how a difference in color can be depicted with a single drawing tool.
When considering how to draw a horse by rendering shades, the most shaded areas of the horse’s shape are rendered first. I do not use the full strength of the pencil; instead, a very light pressure is applied to the drawing tool.
How to Draw a Horse – Red Pencil Hatching
In this “How to Draw a Horse” video lesson, I do parallel hatching with short, diagonal pencil strokes. The direction of strokes reveals the contours of the horse’s three-dimensional shape. The contours of an object are imaginary lines.
The meaning of contour is not the same as the outline. The outline is the visible line that we see around the object. However, the hatching of shades in red pencil is done along the contours. Imagine if the object was cross-sectioned in any direction you chose to do so.
The lines of such cross-sections will be the contours of this object. Since these imaginary lines are following the shape of the object, rendering along those lines reveals the object’s shape.
How to Draw a Horse – Drawing Approaches
Some art schools in America and Europe disregard this simple rule. They teach that rendering should be done by scribbling and lifting the pencil from the paper after each stroke is not required. The less line-strokes visible, the better. I come from another school that has long traditions of classical drawing, which goes many centuries back in the history of art. An exceptional signature of pencil strokes makes your style unique. You are the fine artist, not a photo-copier, so why hide the human hand in a piece of art?
That is why I advocate the honest and creative approach in drawing. Do not hide the drawing tool lines; make them your friends, instead. A wide variety of lines and hatching styles are available to you. Practice and perfect it. The drawing becomes much more valuable when an individual style is present and recognizable.
I don’t just fill the paper area with the tone; I make the tone speak though the direction and other features of line, like: the line tone, its thickness, length, curvature and so on. This variety of line features is called, gamut. The artworks with wide and well-balanced gamut look much more professional than artworks done in one hatching method.
How to Draw a Horse – Inspiration
The subject of this “How to draw a horse” lesson was inspired by a life event that took place in Dover Castle, England. It was a three-day event when dressed in medieval clothes; people recreate the life-style that used to be in that area many centuries ago. This event also includes knight fighting. Dressed in heavy armor, horsemen play the leading role in this spectacle. No one is hurt during this chivalry fight, but spectators learn a piece of English history in live action.


