Discover How to Draw a Dog
In this video lesson, you will discover how to draw a dog in realistic manner. I will show how to draw in graphite pencil, a well-rendered picture of a German shepherd. The purpose of this lesson is to present rendering techniques when drawing an animal’s hair and fur.
Enroll in the Drawing Academy Course
Pay once - Enjoy forever!
Only $297
How To Draw A Dog Step by Step
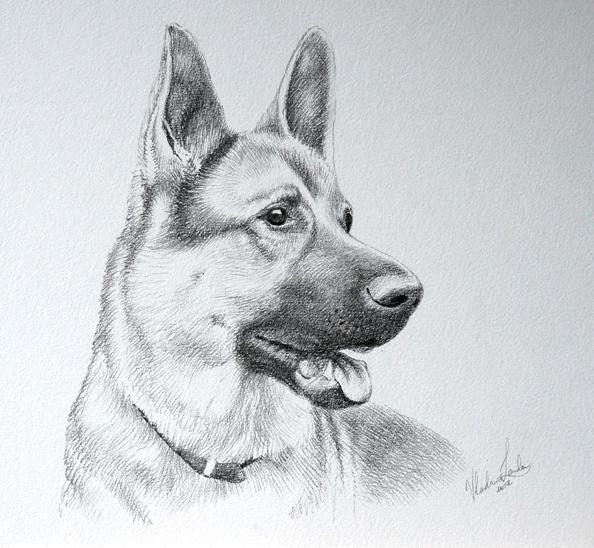
How to draw a dog is an interesting subject. I begin this ‘How to Draw a Dog’ video lesson with an outline of the German Shepherd’s head half-turned to the right hand side. By this time, you must have seen many Drawing Academy video lessons on how to draw in general, so the subject of drawing contours of the animal’s head should not be a challenging task for you.
When it comes to the topic of ‘How to Draw a Dog’, good animal drawing approach is as follows: you start with the position of your drawing board and decide whether your paper needs to be placed in a landscape or a portrait arrangement. When the decision on the overall composition is made, you begin sketching big shapes first.
The big shapes, in our case, are the position of the dog’s head and also the positions of the neck and shoulders.
Check the ratio of the figure’s height to its width. Is it square or rectangular? In case it is rectangular, is it a vertical or horizontal rectangle?
Observe the model and decide what is the angle of the virtual central line that goes from the top of the dog’s head, between its ears, down between its eyes and ends at its nose.
When the overall head proportions are done, and you’re considering how to draw a dog further, you can progress with smaller details and animal’s features. Decide, for example, on the dog’s head shape and volume. The head is a three-dimensional object that can be described by simple geometrical figures. The fine artist needs to recognize those figures and make a mental image of the head’s construction. Imagine that you have the task of making a dog head model from wire. Such wireframe objects would be completely transparent, so you could see through it and understand the positions of all the elements joined together.
Geometrical figures that represent the oversimplified dog’s head have planes and edges. You can map those planes and edges between planes directly on your drawing. Alternatively, you can keep geometrical figures in your head and use a virtual mental image of the planes and edges.
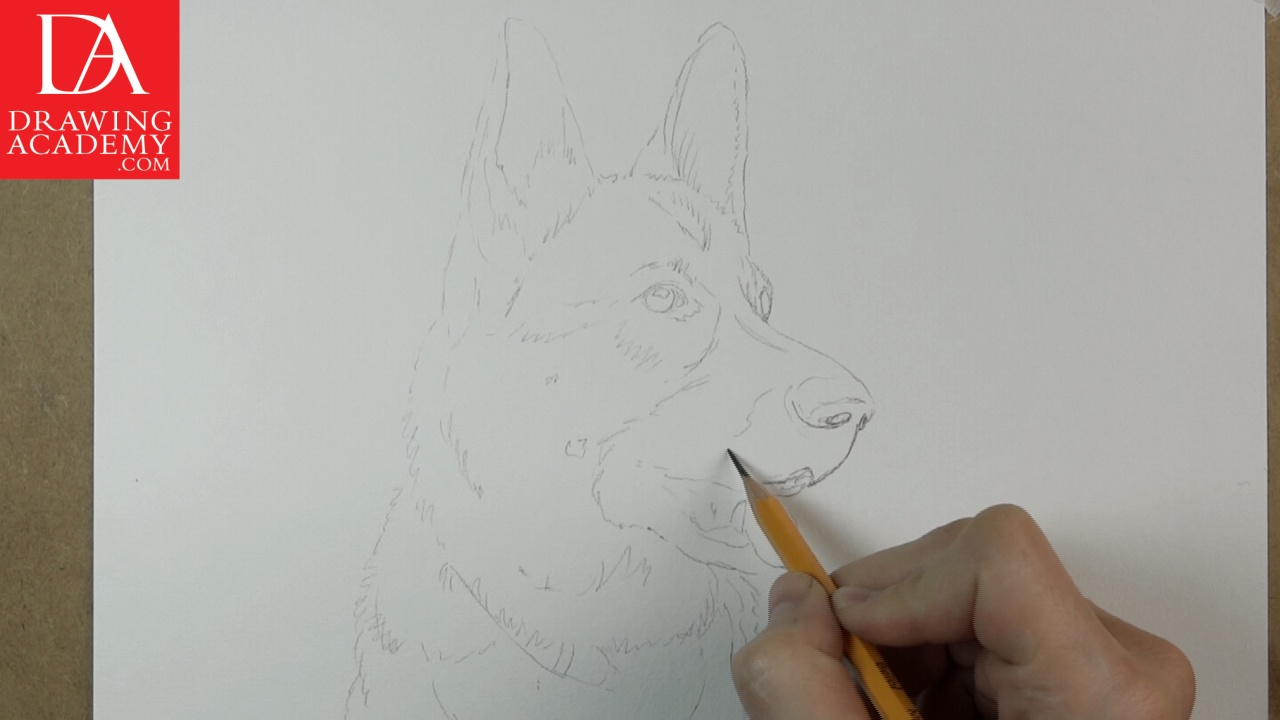
In this “How to draw a dog” video lesson, I will mostly use 3B grade pencil. It is soft enough to give a wide variety of lines from very light and thin marks to quite bold and dark lines.
I render the dog’s head shades starting from dark places. In the “how to draw a dog” video, the method of shading is very similar to traditional academic drawing. In most cases, I will use hatching and not as much cross-hatching. The reason for that choice is the texture of the dog’s fur.
Hatching in short pencil strokes will give a better representation of the hair. Of course, the texture will benefit from the pencil strokes that go along the hair.
This “how to draw a dog” video features the dog sitting outdoors. The weather is slightly cloudy with no direct bright sunshine. The shading of the dog’s head has reduced contrast because of diffused light. Lighter and darker areas of the dog’s head are stipulated by the tonality of its fur, as well as, by the direction of the light. The top planes of its head will be lighter in tone than the under-planes.
The eyes of the dog have the strongest contrast on this drawing. The right eye has the brightest spot of reflected light, as well as, the darkest tone of the drawing. I do this dark spot in full strength to establish the benchmark of the maximum tone this pencil can provide. All other tone volumes will range between those contrasting light and dark values.
The drawing in this “How to draw a dog” video will be realistic enough that a viewer will be able to recognize this particular dog; however, I want to avoid hyper-realism. The purpose of this artwork is to capture the likeness of the model, while having the freedom to express my artistic ideas. I will do some areas with less attention while concentrating on features that make this dog recognizable. This dog belongs to my friend and the finished artwork is intended as a present. In the next few days, I will frame it and post it to my friend as thanks for the great weekend we had in the countryside on the White Cliffs of Dover above the English Channel.
You will see in this “How to draw a dog” lesson that working on the dark areas of the drawing first gives me more control over the process. I know the maximum tonal value this pencil can produce. Now I can compare tonal values of other dark areas to each other and make sure I am keeping the artwork within the boundaries of the tonal range. It is always better to under-render than to overdo tonal values. It is easier to deepen dark areas gradually than to fix over-rendered tones.
Every pencil stroke in this “how to draw a dog” exercise is done as a separate mark. I draw a line in the direction of the hair, then lift the pencil from the paper and move it to the starting point, mark another line and so on. Rendering tone in graphite pencil without lifting the pencil will produce a smudged and dull surface. You definitely want to avoid such results. The beauty of the pencil drawing is in its gamut of lines. These lines create the illusion of depth; the three-dimensional form of the model. The variety shown in a line’s width, length and shape creates a live and vibrant drawing. The individual style of the artist is visible through his pattern of lines. It is like a personal signature; this is what makes your drawing valuable.
How to Draw a Dog Approach
You might ask a question: “how to draw a dog, when this animal isn’t sitting still?”. Drawing dogs is very different from drawing, for example, a still-life or human model. Even well trained dogs will not sit still for a long time. The fine artist only has a few minutes to capture the animal’s main features in broad strokes and then, they must work from imagination and memory.
When drawing dogs and other animals, I would suggest starting with multiple gesture sketches, which can be done rapidly. Sometimes, animals will keep still for only a short period of time, so you may only be able to make a single line. That is fine, do not expect long poses and do not force the dog to pose for you. Keep this exercise natural, a dog is a dog and enjoys your company, not your drawing.
After several dozen unfinished sketches, you will start grasping the idea of the dog’s head proportions and main features. Keep sketching; sometimes you will have to do hundreds of preliminary pictures before you fully understand an animal’s figure proportions and shapes. I hope you see now why I skipped the preliminary sketches in this video. It would be too long and boring to watch multiple, unfinished, one-liners that don’t look like much at all.


