How to Draw an Ear correctly
Video Lesson Description
In this video part, you will discover How to Draw an Ear, including the main features of an ear and how to depict those features in relation to each other, as well as, how to position ears on a human head.

How to Draw an Ear
When it comes to the subject of how to draw an ear, you need to know that an ear outline looks like a shell from the side view. Its outer contour resembles the character, “C”. However, just drawing a letter “C” would not be a realistic approach. There are certain anatomical features of which you need to be aware.

The upper outside curve of the helix features the tubercle, which is a small knot also called, Darwin’s point.
When you think how to draw an ear, remember that the height of the ear, is twice longer than the ear’s width.
Another part of the ear is the firm projection, tragus. This form overhangs the opening to the ear canal.
The lower part of the outer ear is called, lobule.
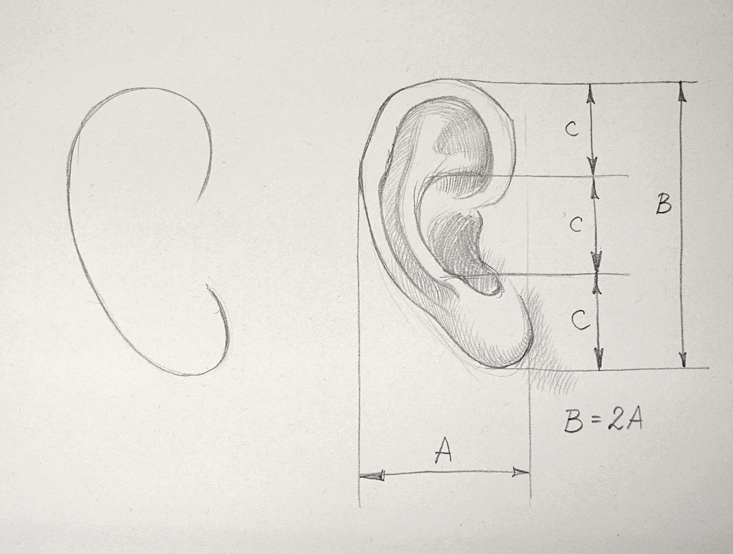
Considering how to draw an ear, vertically, the ear can be divided into three equal parts. The top part is bordered by the antihelix – which is attached to the side of the head. The middle part is taken by the ear’s bowl, which is called, concha. And the lower third part is the lobe of the ear.
Now let’s examine the ear’s position on a human head. Do not make the junior mistake of placing ears too high. Here’s the rule: the ear is located between two virtual horizontal lines – below the eyebrow-line and above the nose-line.
When you’re practicing how to draw an ear, be aware that the ear is tilted from the vertical position about 15 to 20°.
When viewed from the back, the outer rim of the ear stands away from the head. The angle of the ear tilt seen from the back is about 20°.
In this video lesson on how to draw an ear, you will also discover how an ear changes its position when the head is tilted up and down. Understanding of these mechanics will help you to position ears on a portrait drawing correctly.
In a normal head position, the ear is located between the horizontal line of the eyebrows and the nose-line.
When a person turn ones head upward, the ear stays almost in the same position while face is turning up.
When a head is turned downward, an ear goes lower along with the head.
- Receive 15 new videos monthly (45 in total)
- Incredible discount – $4,164
- Bonuses - Fine Art eBooks and Videos
- Drawing Academy Diploma of Excellence after course completion in 3 months
- Personal coaching by Drawing Academy Tutors
- Lifetime membership. Free after the 3rd month

- Immediate access to all 45 video lessons
- Incredible discount – $4,198
- Bonuses - Fine Art eBooks and Videos
- Drawing Academy Diploma of Excellence after course completion in 3 months
- Personal coaching by Drawing Academy Tutors
- Lifetime membership. No more payments