Drawing in Perspective
How to Draw in Perspective
Video Presentation
By Vladimir London

Drawing in Perspective
Hi, as the Drawing Academy tutor, I get many questions from academy students about how to draw in perspective.
In this presentation I will cover most common perspective types and also will show how to use them in drawing.
You will find out the following types of perspective:
• One-point perspective;
• Two-point perspective;
• Three-point perspective;
• Four-point perspective;
• Photo-perspective;
• Perceptive perspective;
• Parallel perspective;
• Reverse perspective;
• and Aerial or atmospheric perspective.
This list is not exhaustive, but for purposes of drawing it would cover most of the artist’s needs.
What is perspective?
Perspective is a method of drawing three dimensional objects in space on a two-dimensional surface to achieve the right impression of reality, depicting objects’ sizes and positions in relation to each other.
All perspective methods can be divided into two groups – linear and aerial.
Linear perspective deals with objects foreshortening and minimizing image distortion. It is based on rules of geometry.
Aerial perspective helps to depict the depth of view and influence of atmospheric effects on the appearance of objects.
Both methods deal with rules of visual perception by a human being observing the world through their eyes and interpreting visual information in one’s brain.
Which method of perspective is the correct one?
I have to say that no kind of perspective fully solves the challenge of depicting three dimensional objects on a flat surface without distortion. So the question “what is the correct perspective method” has to be rephrased: “What perspective is better to use for depicting certain objects in particular compositions?”
There is no “magic” perspective method that will deliver the best results in every single drawing. That is why a fine artist must know them all to be able to recognize which one to use for a specific drawing.
What are the main rules of perspective?
The rules are quite simple and can be seen in our everyday experience. The objects closer to a viewer appear bigger than similar objects located further away. The objects on a foreground will partially or completely cover objects on the background if they are aligned on the same ray (line) of view. The further away objects are, the less detailed they look and the less contrasting and saturated their colors become.
These rules were known to fine artists for many centuries. Here’s what Leonardo da Vinci said about perspective: “There are three aspects to perspective. The first has to do with how the size of objects seems to diminish according to distance: the second, the manner in which colors change the farther away they are from the eye; the third defines how objects ought to be finished less carefully the farther away they are.”
History of drawing in perspective
Since prehistoric times mankind depicted three dimensional nature on a flat surface. Here are the drawings by a Stone Age artist done 32,000 years ago. This is the oldest art known to man. It was discovered in a cave located in Southern France.
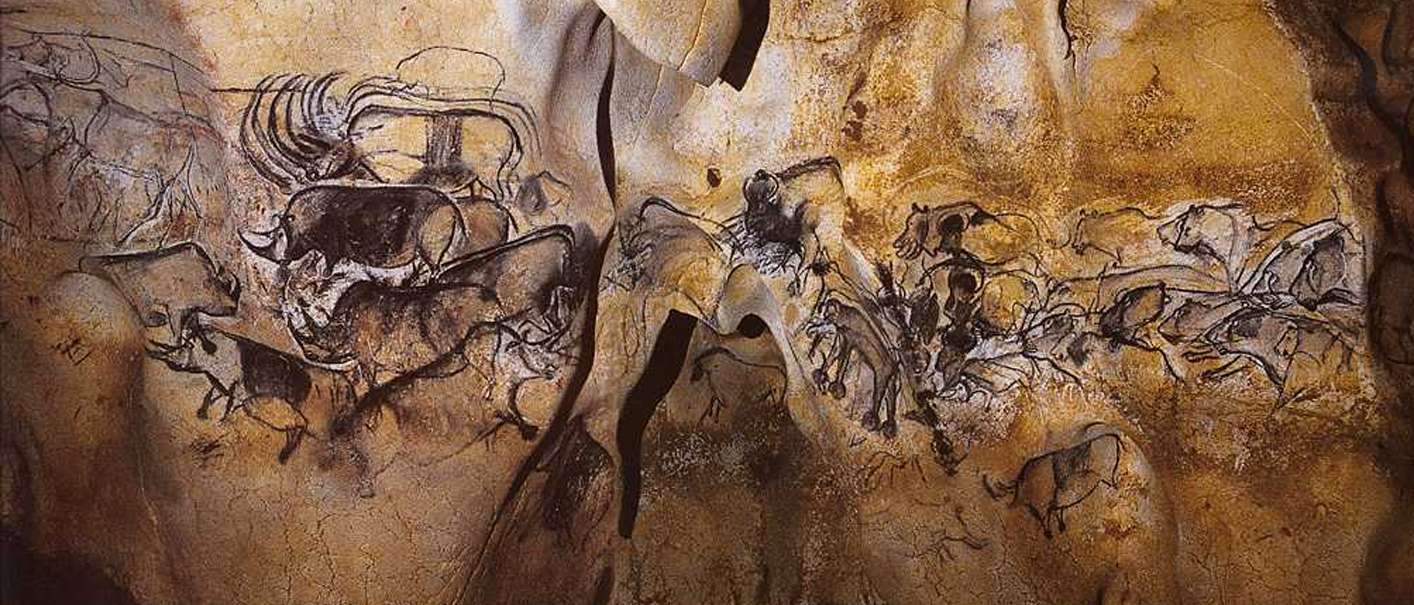
The cave wall murals portray various animals using extraordinary expressive drawing techniques. The ‘panel of horses’ has use of perspective, which shows several animals on the same plane. Similar perspective is applied for lions, rhinos and other animals. The animals that are closer to the viewer are bigger in scale and partially cover the animal behind.
Similar perspective can be found in ancient Egypt frescoes and drawings. Human figures are arranged in planes and the modern viewer has no difficulties to understand which figures are closer and which are further away. In Egyptian art, the scale of figures does not always follow the rules of perspective as characters’ size often corresponds to their social hierarchy.
Egyptians artists often arranged drawing compositions in horizontal bands, which gave clear representation of different fields of view – foreground, middle-ground, and background.
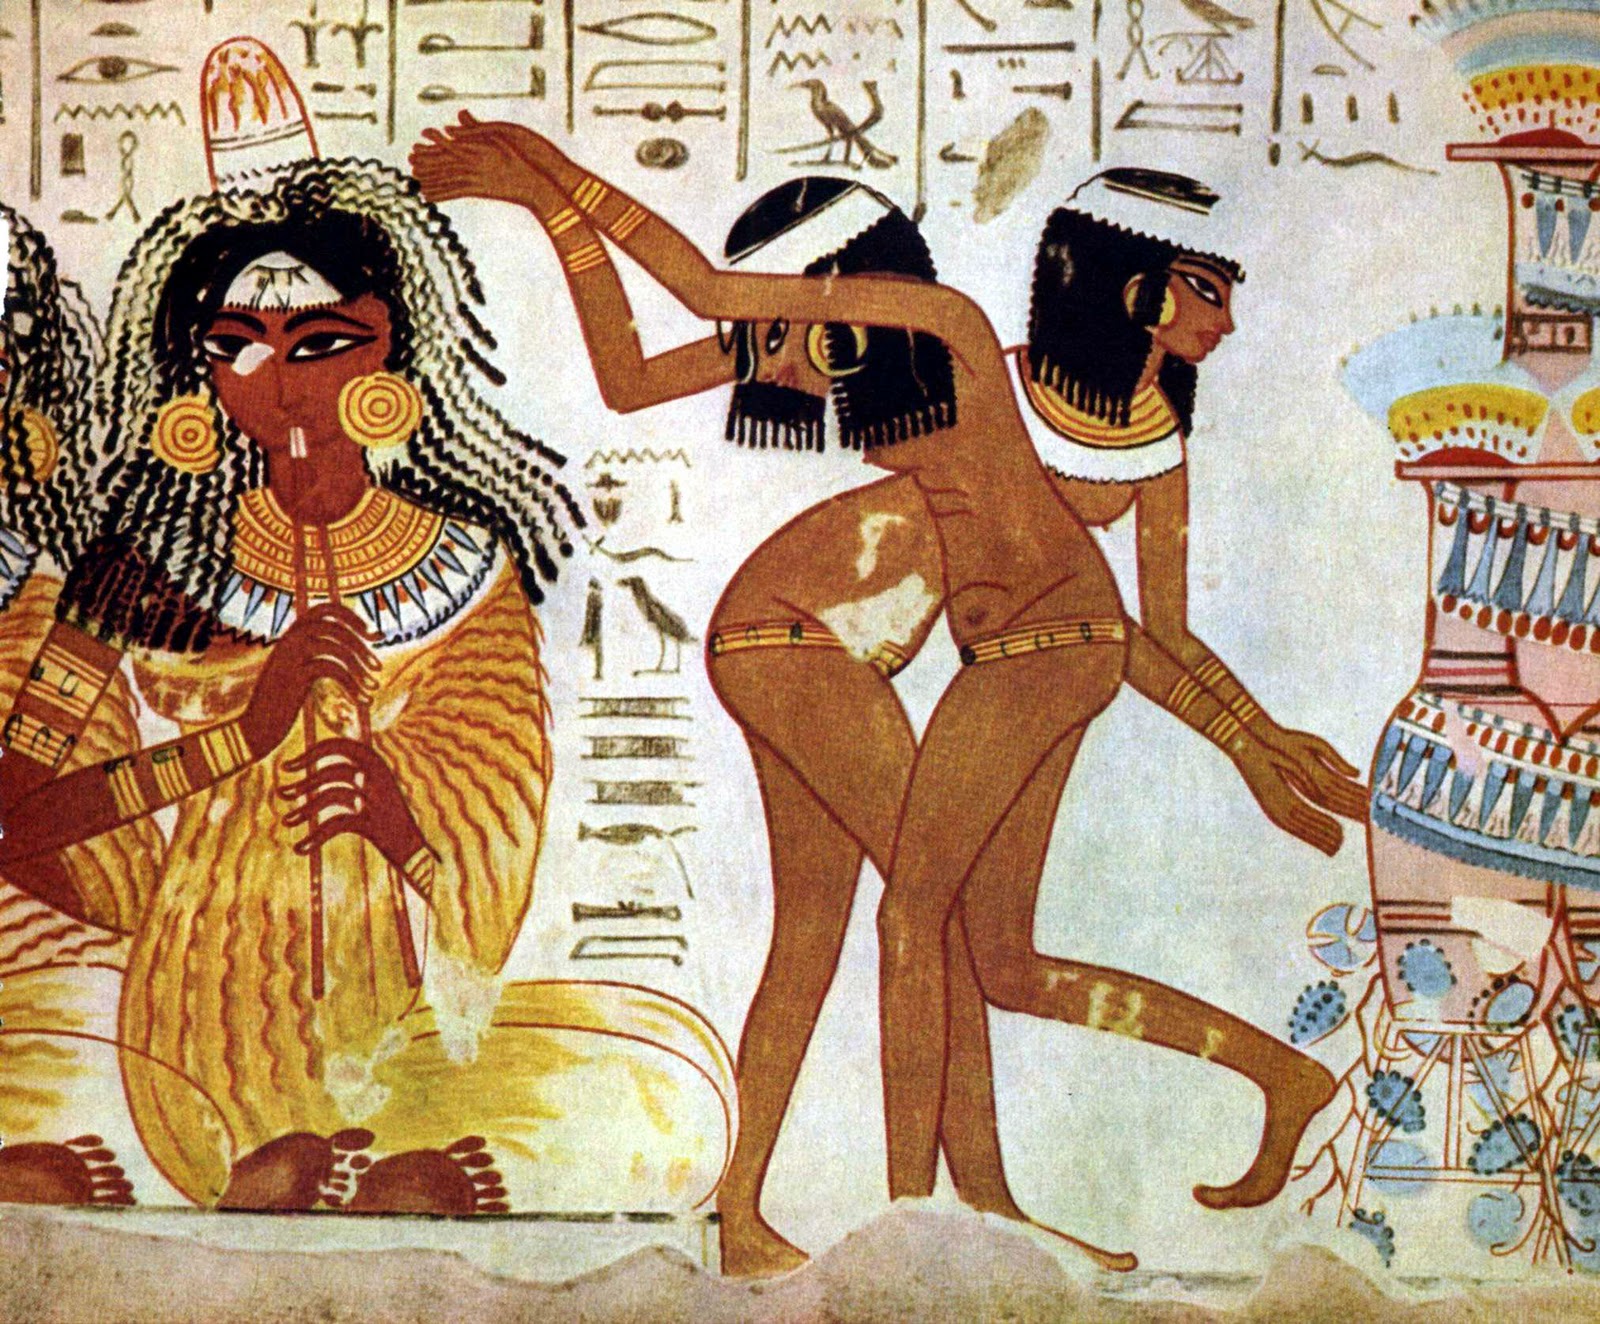
Fine artists of Ancient Egypt developed their methods of perspective to the level that was perfect for creative tasks they had, so it cannot be improved any further without breaking the established visual style of Egyptian art.
The European art of the Middle Ages has another type of perspective. It is quite simplified but still portrays the reality so the viewer can understand spatial relationships of depicted objects. Sometimes the Parallel Type of perspective was used in cityscape drawings, so they look more like plans or maps.
Parallel perspective is also present in this highly realistic painting by Andrea Mantegna where the body of Christ is drawn with foreshortening but relative sizes of his body are unaffected.
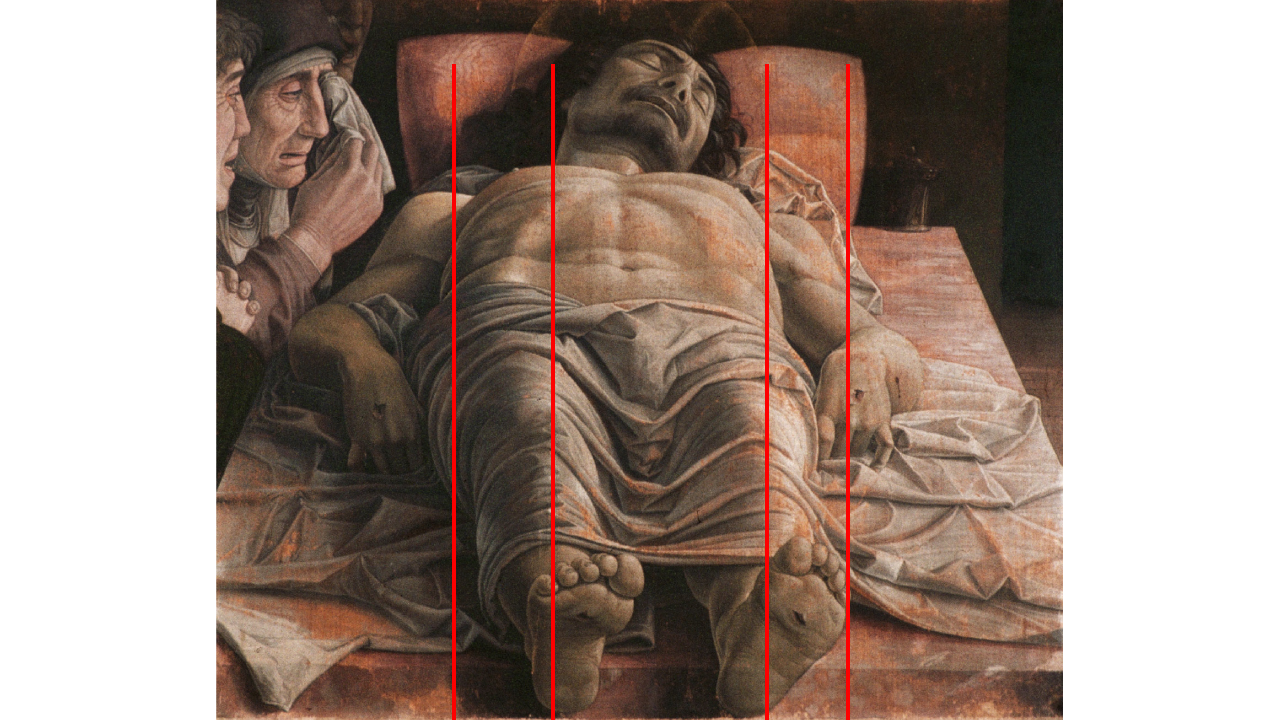
This parallel perspective is used in combination with one-point perspective, where two edges of his support will eventually meet in one point.
One-, two-, and three-point perspective found a new life during the Renaissance time. Understanding rules of linear perspective helped fine artists depicting the world in a realistic manner. However, many of them realized that following linear perspective to the point gives unwanted distortions and often corrected such distortions by introducing multiple vanishing points on various levels.
Here’s the fresco by Raphael “The Athens School”. The main vanishing point of this composition is located on the hand of Plato; however, the background has the lower horizon line.
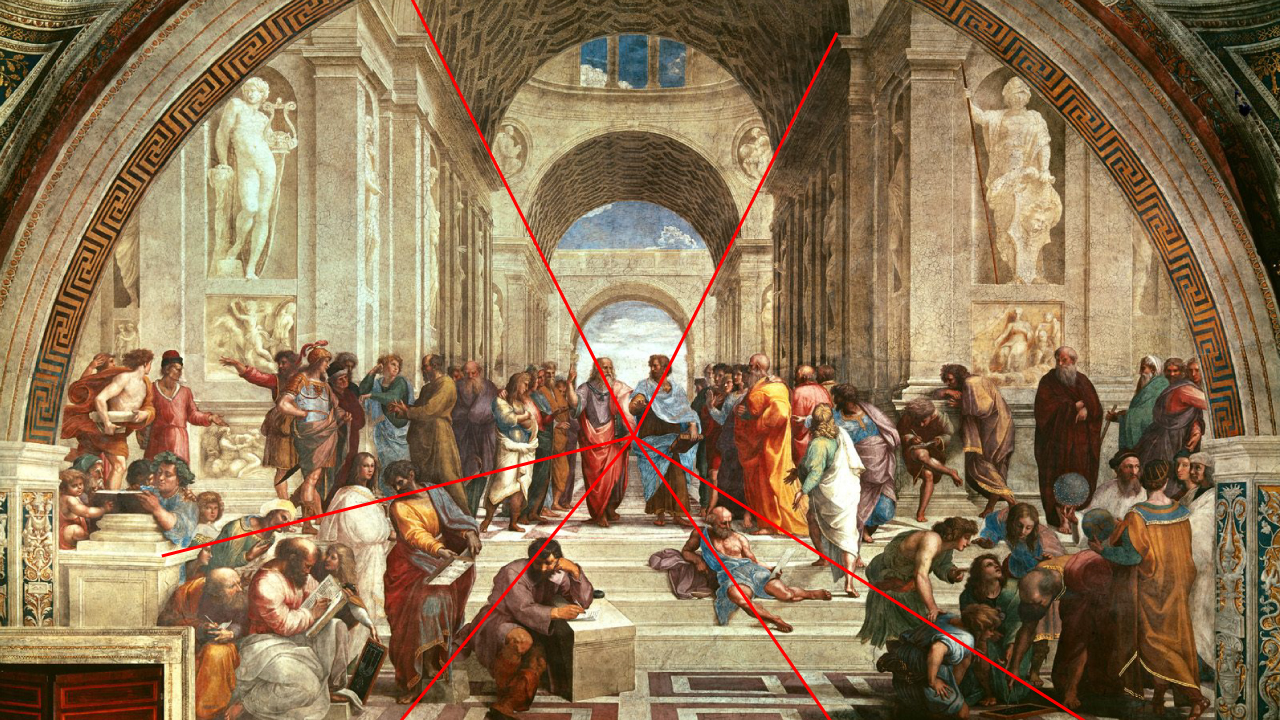
At the same time, the group of people, surrounding Plato, is drawn in parallel perspective, while Plato’s support has clear one-point perspective.
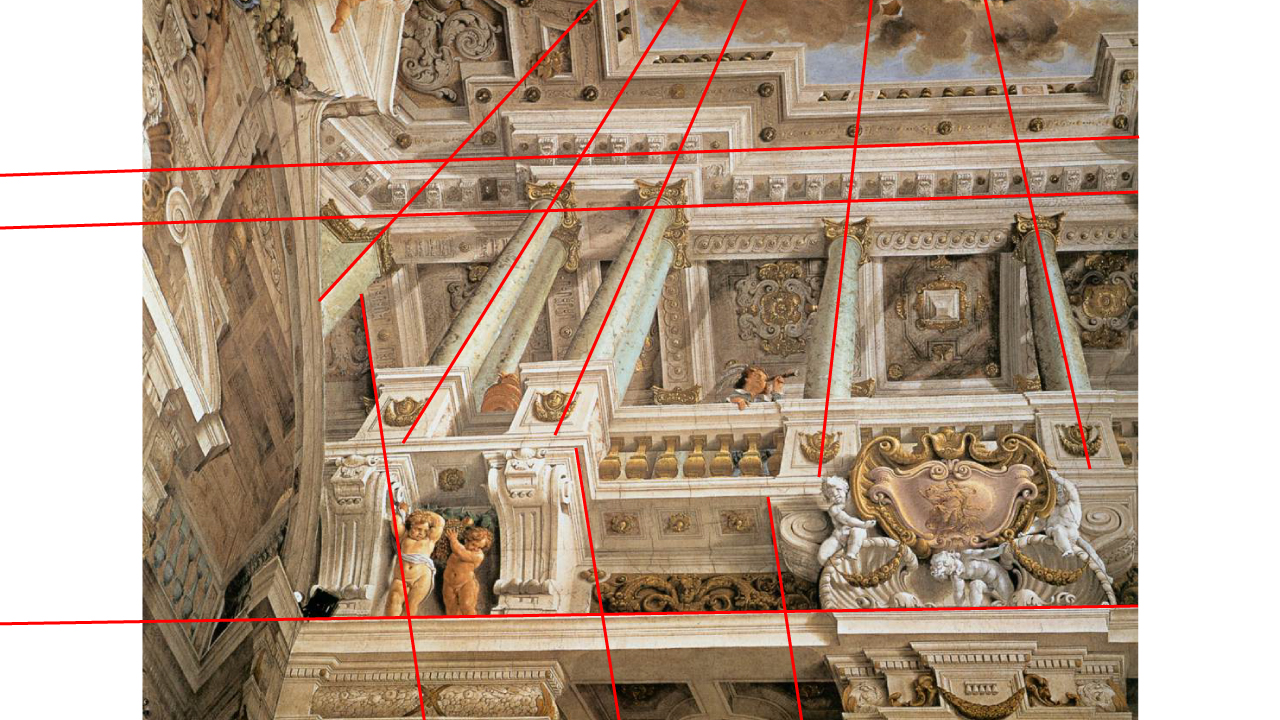
Here’s the painting by another renaissance artist, Paolo Veronese: “The Marriage at Cana”. In this artwork the artist adopted multiple vanishing points using several one-point perspectives. The vanishing point of foreground buildings coincides with the head of Christ – the main focal point of this composition. At the same time background buildings seem to have a higher horizon level, yet the vanishing point of the floor is located in the sky and the big table is drawn with an even higher vanishing point.
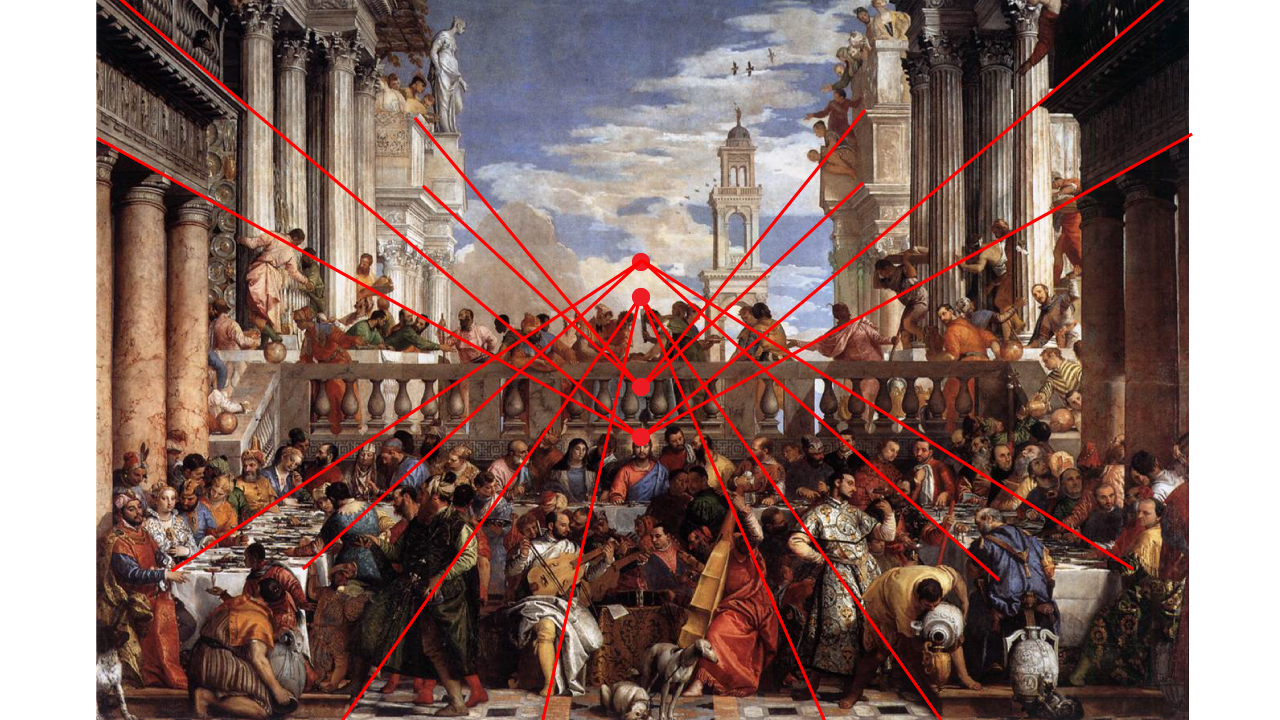
I’m certain that Veronese knew that vanishing points of horizontally located objects can only be on the horizon, yet he bends the rules of perspective to construct his composition to be more believable and realistic, thus compensating distortion of liner perspective.
Russian Orthodox art of the 12th to 19th centuries has an iconography-drawing canon that uses the Reverse Perspective. This type of perspective contradicts the photo-reality, when parallel lines seem to meet in the vanishing point on a horizon level. Instead, such lines on Russian icons are diverging apart rather than converging in one point.
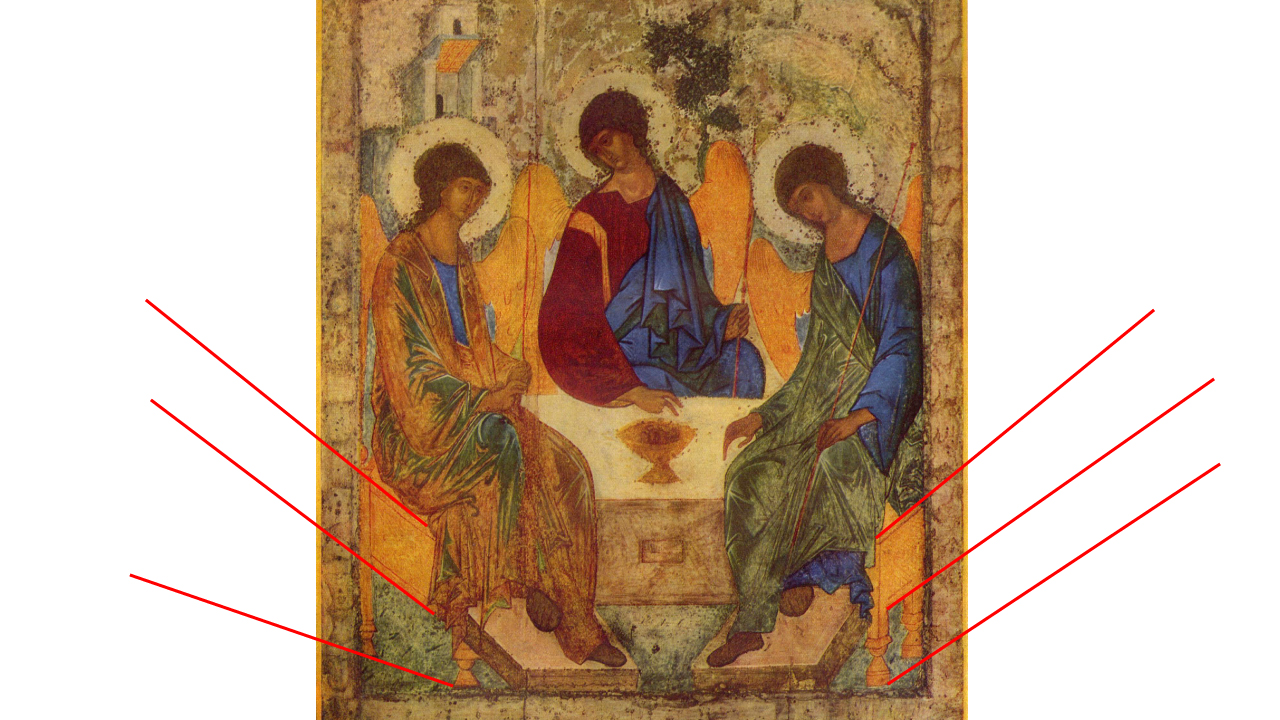
Strangely enough, this type of perspective the best reflects a cognitive perception of the world happening in a human brain. We have binocular vision and see objects as two slightly different pictures from two points of view; our brain makes an effort to analyze those pictures and merge them into one mentally. Russian icons take this perception to a different level and instead of going away from the viewer in converging perspective, icon images step into a viewer’s world.
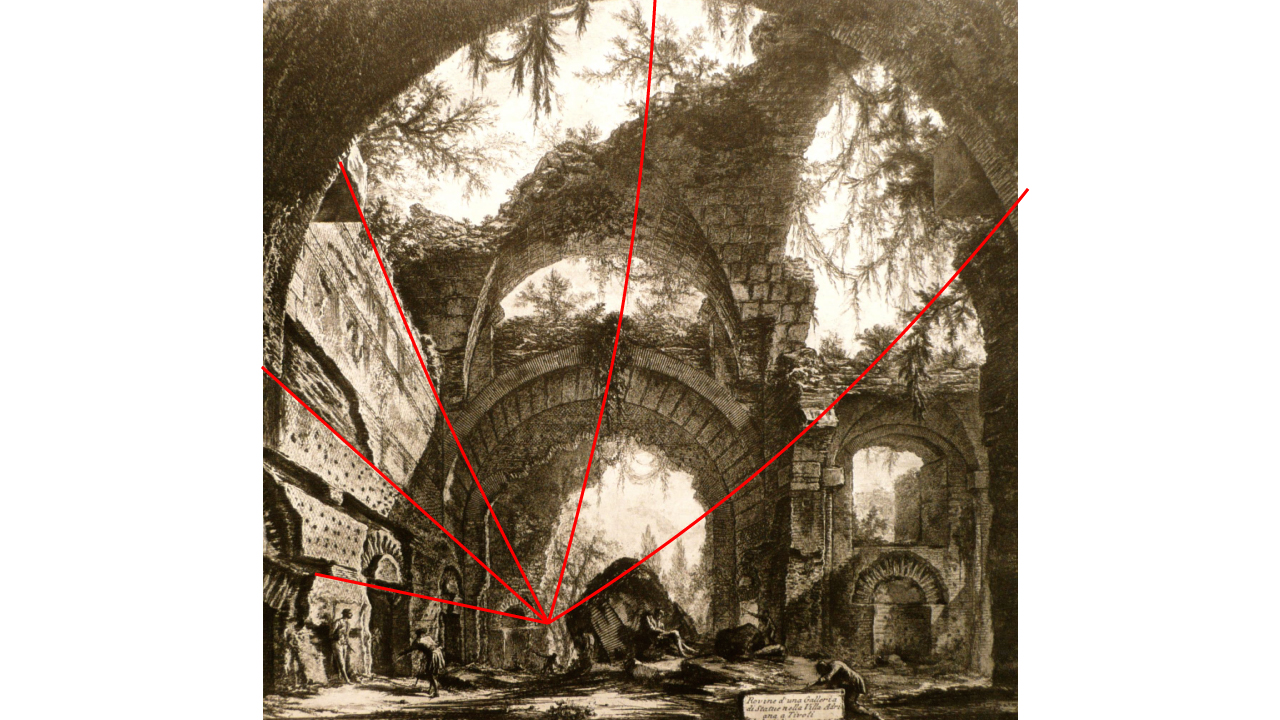
Many fine artists use Perceptive Perspective, which bends straight lines to minimize distortions of various grounds.
On this picture you can see that perspective lines are not entirely straight. A fine artist reduced distortion of architectural ruins by stepping away from linear one-point perspective. Here’s another illustration of Perceptive Perspective.
With recent development of photographic equipment, when high-megapixel cameras become affordable, we see a sharp increase of drawings featuring Photo Perspective. This kind of perspective is present in artworks because they are mindlessly hand-copied from photos without creative input in composition and constructive drawing.
How to draw in perspective?
I will make a few fast and rough sketches to illustrate various linear perspective types.
One-point Perspective
Let’s begin from the simplest type – the One-point perspective.
I’ll do a sketch of a cube that faces the viewer frontally. It is located below the viewer’s eyes level, so the horizon line is indicated above the cube. The front plane of the cube is seen as a square. From the corners of that square I’m drawing lines, which converge in one point on the horizon line. This point is called the vanishing point. I mark edges of the cube’s rear plane as if this object is completely transparent and we can see through it. I’m using a black pencil to outline the visible edges of the cube. Because the cube is seen from above, only two planes are visible – the top and front ones.
For this painting of Piazza San Marco in Venice, Canaletto used one-point perspective. However, this canvas has not just one, but three vanishing points on the same horizon line.
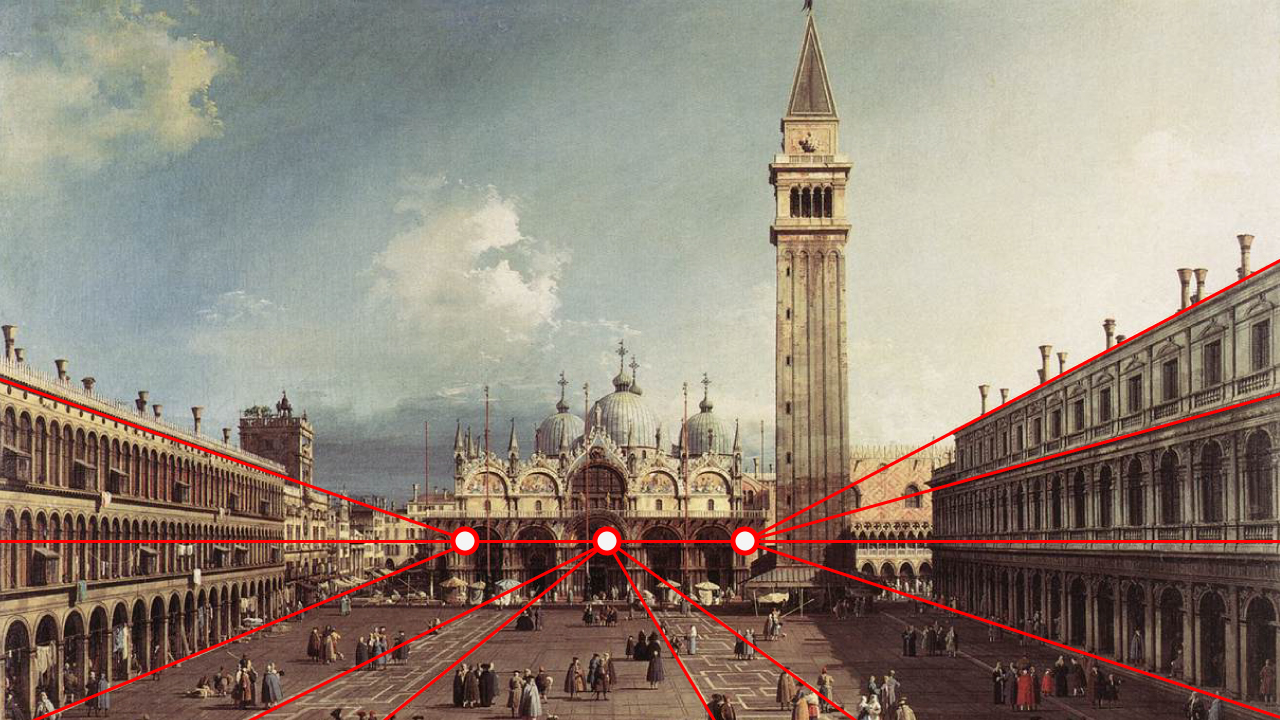
There are two vanishing points for buildings on the left and on the right, and one more for the ground. Despite having three vanishing points, it is still the one-point perspective, which has been used three times for various objects.
I will make another sketch of the one-point perspective, this time amending the rule by shifting the cube to the side from the vanishing point. Once again, the lines of all side edges of the cube will meet in one point on the horizon line. The front plane of the cube is depicted as an undistorted square. This is approximation. Strictly speaking, this plane has to appear with distortion. However, quite often fine artists choose to draw frontal surfaces as if they are located straight in front of a viewer’s eyes. I’ll outline the visible edges of the cube in a black pencil.
So far we draw a cube located below the viewer’s eye level. I’ll quickly illustrate another example of a one-point perspective where horizon lines goes in the middle of a cube; so the top part of this object is seen from below while the bottom part is seen from above. In this sketch, I will also approximate frontally located surfaces so they appear without distortion.
Here’s an example of the sketch taken from the Drawing Academy video lesson. As you can see, the lines of the façade are converging in one-point perspective, while the side wall of the house is depicted as un-distorted.
This type of perspective is clearly seen on the masterpiece by Bellini, Annunciation. The artist used a single vanishing point above the angel’s head. All horizontal lines of the building side, which is facing us, go perfectly in parallel to the horizon line.
Two-point Perspective
I will make another sketch, now showing the two-point perspective.
A horizon line will be located above the object, so the viewer’s eye level is higher than the cube. The cube’s vertical edge is indicated by a vertical line. Two lines are going from that edge and meet on the horizon. The dot where they meet at is the first vanishing point. The second vanishing point is also located on the horizon line to the left of the cube. Horizontal edges of the cube’s frontal plane will virtually converge in the second vanishing point. All vertical edges are drawn upright, while all horizontal edges are following the two-point perspective. I draw this cube as is it is transparent, so all planes and edges are marked. All visible edges are outlined in black.
Now, let’s make another illustration of how two-point perspective works for an object seen from below. This time the horizon line will be located under the cube. Lines of all horizontal edges come together in two vanishing points – one on the left and another on the right hand sides. I will indicate visible edges in black and shade the bottom plane of the cube to give it a more three-dimensional appearance.
In the Drawing Academy course I presented multiple video lessons where two-point perspective is used. Here’s an example of the video lessons on how to draw a building in perspective. It is based on the St. Paul Cathedral in London. The majority of the construction is seen above the viewer’s eye level and illustrates the case when perspective lines go down to vanishing points on the horizon.
The composition of painting by the Russian fine artist is built in two-point perspective.
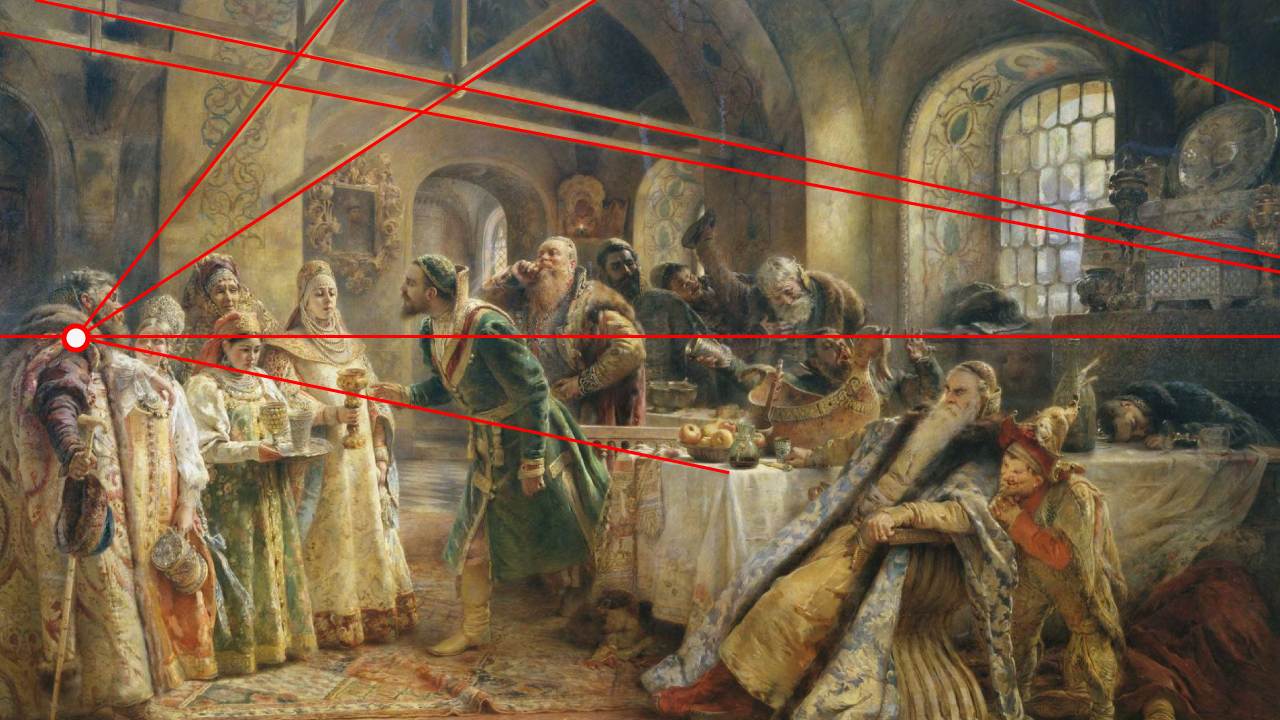
One vanishing point is located on the shoulder of the left-hand side figure and this point indicates the location of the horizon line or viewer’s eye level. The second vanishing point is to be found outside of the painting canvas. It will also be located on the horizon level.
Three-point Perspective
Sometimes a two-point perspective is not enough to realistically portray objects that are seen from far above or far below the horizon level. A three-point perspective is usually used when a viewer has to turn his or her head up or down to see an object. In the case of a three-point perspective, not only will the horizontal edges of an object will be tilted toward vanishing points on the horizon, but also the vertical edges will incline to the third vanishing point far above or far below the horizon line. On this sketch, all three vanishing points are located outside of the paper edge. I will indicate with three arrows the directions where three-point perspective lines are converging.
A three-point perspective is often used by fine artists in ceiling frescoes because the position of frescoes is high above the viewer’s head.
This composition has used three point-perspective with horizontal lines of the building converging to the far left point as well as to the point that is located far down. However, there is the third vanishing point far up, and vertical lines of columns are pointing toward that point.
Four-point perspective
When a viewer looks on an object quite close or when an object has a significant size, it is seen both above and below the eyes level. In such a case, a four-point perspective can be used to depict this object. I will make a rough sketch to illustrate this kind of perspective. There are four vanishing points here. Two points are located on a horizon line, while two more are above and below it. The top cube is seen from below and has three vanishing points. At the same time, a similar cube that is seen from above has a different vanishing point, which is located far below the horizon. These two cubes can be integral parts of the common bigger object. Vertical lines are not straight, but bended, so they can simultaneously converge in two points. This makes a total four points in a single composition. I will indicate these four vanishing points by arrows.
Here’s the drawing of two male models by Russian artist Fedor Bruni done in 1813.
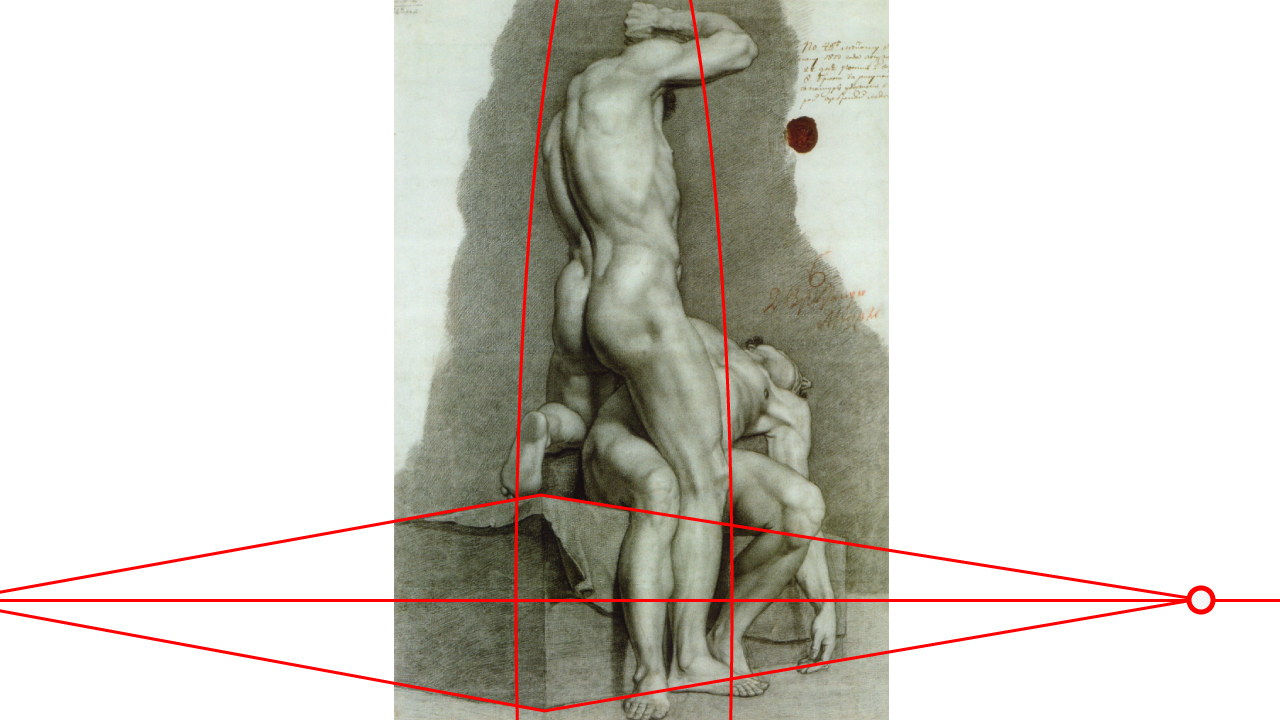
The models’ support is drawn in two-point perspective, with one vanishing point to the right of the drawing, which is located on the horizon level, and another point to the left, outside of the visible area. The standing model is seen both above and below the horizon line, so artists used two more vanishing points – far above and below the drawing. The model’s back, shoulders and head are realistically depicted as if we are looking from below, while his foot is seen from above. The four-point perspective makes this drawing very realistic.
Photo-perspective
The four-point perspective brings us closer to the photo perspective. In photo perspective, all tilted lines will appear bended as if they are distorted by a photo lenses. Both horizontal and vertical lines of object’s edges can curve in photo perspective. Here, I’m indicating with a pencil that lines are not straight. Curvature of perspective lines is applicable to the visible and invisible edges of the cube. I will mark the visible edges in black pencil, so you can see how the cube is distorted here.
With development of the photographic equipment, there are more and more artists that choose to use photos to draw from. Artworks drawn from photos include photo-lens distortion as they are copied from the original photos dot-by-dot without any creativity or interpretation.

The practice of drawing from photos is copying and cannot be called a fine art in its true meaning. To find out why, you may check another video presentation in the Drawing Academy course named “Why drawing from photos is treacherous”. In that video I explain why drawing from photos can prevent you from learning good drawing skills.
Perceptive Perspective
Another kind of perspective where a fine artist intentionally bends straight lines of linear perspective is called the Perceptive Perspective. This perspective method allows the artist to minimize distortion of three-dimensional space on a flat surface of drawing.
I will draw a rough sketch of an interior using the perceptive perspective method. Perspective lines of imaginary room ceiling and floors are bent in such a way that higher the point of view the less tilted the lines of the ceiling are. The same goes to the floor lines – the foreground is less tilted toward the vanishing point than the background. That is why these continuous lines are curved. Straight lines are used to indicate vertical and horizontal lines of the room’s front edge. The same rule is applied to the wall on the background. It is depicted as a perfectly straight rectangle. I will mark the floor boards in curved lines. The curvature of these lines is changing according to the board position. The closer the board to the central line, the less bended it is. Here you see that horizontal edges of side walls are drawn bent. I will draw a couple of windows on both walls to illustrate how bent lines of perceptive perspective apply here. The vertical edges of these windows are straight. To complete this sketch I will draw another set of windows on the left wall using the same perceptive perspective. The window on the background wall has rectangular shape as it is undistorted in a straight-up view. The decoration on the ceiling follows the same rules. The horizontal lines are straight while vertically tilted lines are curved. I will mark the most prominent visible lines of the drawing in black pencil.
In this example by Emanuel de Witte, we can see how the fine artist used perceptive perspective to reduce distortion of the church’s arches and ceiling. Indicated perspective lines below the horizon are straight, while lines above horizon are bended.
Aerial Perspective
Another type of perspective is Aerial Perspective, which helps to depict atmospheric effects in nature and how air affects the look of objects located within different distances from the viewer. The further an object away, the less saturated its colors are and the less contrast between its tonal values. The edges of an object may become blurry and definition of object’s details reduces.
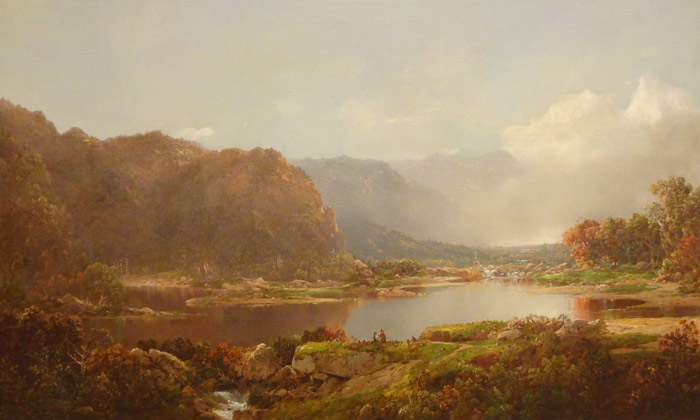
In these paintings of landscapes you can see how air and clouds on the background make warm colors colder and less saturated. The contrast of objects reduces the further those objects are. While objects on the foreground are painted with attention to details, objects on the background become less detailed. The closer the landscape is to the horizon the more pale blue it becomes. However, on this painting of a sunset, the sun tints the sky and mountains in orange and yellow colors. These rules of aerial perspective are good to know and use in painting and drawing.
I hope you found this presentation on “How to Draw in Perspective” useful. If you have any comments or questions, please submit your feedback below on this page, I will be happy to answer your questions in a separate video.
To learn more about perspective sign up for the Drawing Academy course. In this course you will find several video lessons dedicated to one- two- three- and four-point perspective as well as aerial perspective. In addition, many video lessons will show you how to draw in perspective cityscapes and landscapes, geometrical objects, portraits and human figures.
This course is a great educational resource to both beginners and advanced art students who want to learn drawing and improve their drawing skills.
To your creative success,
Vladimir London
Drawing Academy tutor
- Receive 15 new videos monthly (45 in total)
- Incredible discount – $4,164
- Bonuses - Fine Art eBooks and Videos
- Drawing Academy Diploma of Excellence after course completion in 3 months
- Personal coaching by Drawing Academy Tutors
- Lifetime membership. Free after the 3rd month

- Immediate access to all 45 video lessons
- Incredible discount – $4,198
- Bonuses - Fine Art eBooks and Videos
- Drawing Academy Diploma of Excellence after course completion in 3 months
- Personal coaching by Drawing Academy Tutors
- Lifetime membership. No more payments
When I would see people speak on perspective they never bring up older artworks or mention the possibility of reducing distortion by using multiple vanishing point or curved lines.
Nice to see that brought up here.
Drawing perspective very interesting stuff
in 4 years at art school I learned less than here in 20 minutes, I finished art school I have a diploma, but I do not know all this things. Thank you. Great video
Great, Vladimir. Your teaching skills look impressive, and the explanations about perspective drawing were clear and absolutely complete.
Thank you.
Hello Drawing Academy,
Thank you for the upload on “How to Draw in Perspective.” It was a very comprehensive video of the various types of perspective commonly used in fine art.
I learned about how photo-perspective has become so prevalent that it has become cliche, and also about perceptive-perspective, which distorts linear-perspective to fit a canvas (or perhaps how we view things in 2D, after all, our vision is not of a panoramic lens).
You have also added four-point-perspective which is a bonus of the three types of perspective in Month-1 lessons, and I find that pretty cool to use.
All in all, I felt that after this video I am more relaxed in making art because I was always worrying too much about linear-perspective (asking myself all the time “is it spatially correct? will it look realistic?). I never knew historical works can distort some perspective angles as well!
I can rest easy again!
Thank you for the video. It help understand perspective and how to practice by the examples you did. It is gratifying to finally get It!
I have a BA in Art and from what I have seen on the snippets of the course I could see that there is so many things that wasn’t taught in the five semester I attended in College. I will enroll in this course!
I apologize for beating up on the four year accredited University which I attended, but,
!!!!!!!!. Nothing of perspective was ever mentioned. As a former draftsman and mechanical illustrator I was aware of only a few points of perspective: parallel, reverse, photo and perceptive perspective are entirely new to me. I have learned more from these little course teasers than I ever received from my Art Major.
I know the cost of this course is fair and reasonable but sometimes there are those of us who still cannot afford said prices. Wish there were a form of payment schedule I could afford to deal with. Regardless, if you can afford to purchase this course I would strongly suggest it as its teasers promise an enormous amount of knowledge.
As usual, I have learned more about perspective than my four years at an accredited state university with art/art education as my major. Perspective, to my recollections was never taught in any class. Also my time as a mechanical illustrator for a government contractor three point perspective was all that was used. I have, with the passing of days remain amazed at how ignorant I have been about fine art as a whole.
*Thank you very much!